Tools of the trade - Welders, Compressors, Grinders and more
Before we get too far down the road of this restoration, I want to show some of the tools that I use for this project. Some I already had, but most of the big-ticket items are just for this project. It's important to use the right tool for the job. I've found some great threads on some message boards where others have shown their steps and tools in painstaking detail as they do their work, which is enormously helpful for newbies like me. This blog is partially my attempt to contribute what I've learned to help the next guy/girl who's working the same issues get equipped for doing as much as they can in their own standard garage setting.
Now, some caveats -
First, this is written from my perspective as an amateur everything. Outside of electrical work (which seems light-years away from here) I have no professional background, no trade school, no previous anything to fall back on. I did the research, shopped around, and I got what I needed to get a job done for this car, teaching myself along the way. I'm not restoring cars for a living, nor do I have room for all the tools I'd like to have.
My opinions are my own, so be sure and do some of your own research...but for every opinion you find online or in person, you'll find another equally passionately argued valid point for the other side. In many cases, You can spend countless hours researching a topic ("Which air compressor should I get?") like I have but you'll still be back to the basic questions of what you can afford and find. I've found that if there are two or three closely matched choices for a purchase, you're not going to really go too far wrong with any of them. There are guys who swear by brand names like Miller or Lincoln, Ingersoll-Rand or Speedaire, DeVilbiss or Iwata. My advice is do your research, and commit to making a decision by a specific date, or you're waffle forever. I spent a lot of time deciding on how to strip paint on my car. But once I did and decided on the electric sander I wanted, I waited almost a year for a killer sale online for it.
Third, I'm not covering standard hand tools in this post - that'll come later. I'm assuming you'll have the standard complement of screwdrivers, wrenches, sockets, and Hammers of Persuasion, plus a toolbox to keep them in. As we go, I'll cover other nifty tools that help along the way.
So, knowing full-well for every tool choice I've made, there's someone out there who will call me a Communist-loving, mouth-breathing window-licking hack, I'd like to show you part of the toolbox I've assembled to get this job started. For reference, I'm working in a finished two car attached garage in a typical suburban neighborhood, with just a couple outlets for power and not quite enough light.
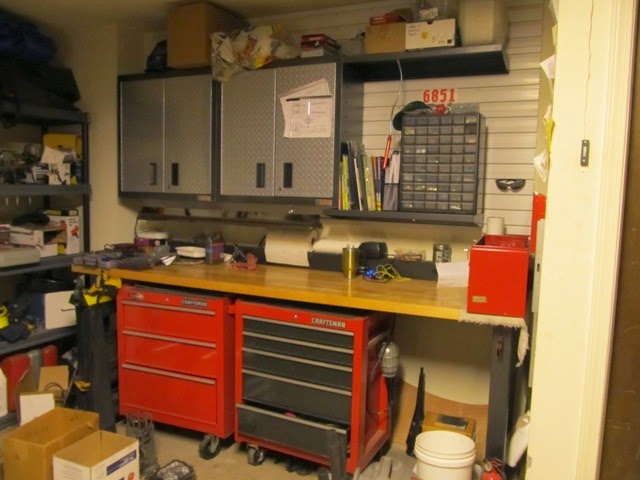
1. Workbench space - this is where I do all my small work, leave my shop manuals, mix primers and generally goof off. I also have a pair of sawhorses an an old closet door for temporary workbench space, but this one is always here. I've got the 8 foot Gladiator bench a long time ago because I'm fortunate enough to have space for it and also because I love beautiful things. This bench is beautiful. Clutter kills productivity. Keep it clean and keep it clear.

2. Bench vice - the other pair of hands when your Apprentice is off studying for an Economics test or working endless Calculus problems (which is almost ALWAYS more important than hobbies)! Plus, it's a poor-man's sheet metal brake in a pinch.


7. Makita 9227C Electric Sander - Search for 'how to strip a car' online and you'll drop into one of amateur restorations deepest rabbit holes on the internet. You'll find endless discussions/arguments of chemicals versus media blasting versus hand sanding. Living in a medium-sized city in the desert southwest, I don't have any media blasters that will return my calls or that don't use soda (bad!). I'm not into stripping, chemical or otherwise, mainly because it's messy and nasty and if it leaks into metal seams, it's bound to leak out and destroy a paint job later. So I've resorted to a combination of razor blade stripping and electric sanding for my car. Two coats of paint would take forever with a dual-action (DA) air-sander (I've tried it), so based on several reviews online, I waited for sale an bought this one. It's perfect for my needs. Yes, media blasting would be nice but it's not an option for me, so this is my Plan B. The nice folks at hotrod.com sum it up nicely:
Do-it-yourselfers will usually default to sanding.
Logistically, it's the easiest method, as the disassembly process is simpler
than for blasting or dipping the metal, and you don't have to transport the car
anywhere to get it done. It's also far less expensive. The thousand or more
dollars you'd pay for blasting or dipping can buy a lot of sandpaper, not to
mention a new air-powered sander, sanding boards, maybe even a new compressor
if you shop smart.

8. Millermatic 140 MIG Welder - another of the endless debates online is what type of welder to get, and which brand. Simply put, if you're asking, you are a newbie. The vast majority of logical opinions and research suggest a a MIG welder is the right answer for a first-timer (with solid wire and shielding gas, NOT the flux core wire!). Easier learning curve, good quality choices, and most importantly, suited for the job. The next choice will be what size, and that's primarily determined by your power source. The Miller 140, and it's Lincoln and Hobart counterparts will work off of 115VAC/20A house power. The next size up will need 220VAC and most of us won't have that, and it seems to be overkill for a classic Mustang project anyway. Most house breakers are 15A, so I had a 20A breaker and outlet added for this while replacing the electrical panel in my house.
I settled on the Miller for a couple reasons. First, it's the right size and a reputable brand I can get parts or service for in town. Second, the Autoset feature seemed like it would be helpful as I taught myself to weld. In the end, the Autoset has not been as big a factor as I thought it would be, but I love the infinite-adjust settings for wire speed and voltage. I would say any of the big three brands I was looking at (Miller, Lincoln and Hobart) are fine as long as you have one that will use shielding gas and doesn't come from Harbor Freight. I bought a nice welder so when my welds suck, I know it's my fault and not the welder. It makes me want to weld as good as the machine is capable of. The whole thing, welder, gas bottle (on the back of the cart) with regulator, cart, mask, and other accessories were had for about $800. If you're not sure, get some quotes from a shop or two for the work you need done, and decide which way you want to go. I wanted to learn how to weld, plus considering how much someone else would charge for all the work I need done, this became an easy answer.

My Apprentice, also with no previous welding experience, was able to weld up this rear end jig stand in an afternoon with some quick lessons. It's made of 1" square tubing, thicker than most anything you'll find on a Mustang. (Its built to allow the jack to come in from behind and lift the axle in and out of the jig). Again, you can agonize over this for weeks, when all you're really debating is a hundred dollar difference or so, or you could just get the one you think is good enough and start learning to weld.

9. The Air Compressor - again, hotly debated in the garage and automotive forums. If you plan on running DA sanders, sandblasting cabinets, and paint/primer guns, you are going to have to get a big compressor. The minimum entry point for this hobby seems to be the 60 gallon 3.7 HP upright shown above. It runs on 220VAC/30A (like a dryer outlet) and puts out about 11 SCFM @ 90 PSI. This thing gets you volume and pressure needed to run these tools. Below this is 30 gallon and smaller and while some will say you 'can' do it, the jump in price from 30 gal to 60 gal is smaller than you think. Much agonizing went into this decision. How big, how much HP/SCFM, oil- or oil-less motor, piston- or screw-type pump, single- or two-stage compression, which brand, how to plumb it in, how to wire it/power it, how to get water out of the compressed air (this is not a trivial thing), where to buy, and on and on. It's frustrating to find a whole new world of things to think of, and all you want to do is run a sander in the garage.
Here's how I decided on all this:
Where to buy: In my town, Craigslist is a bad joke - most sellers want retail prices for used stuff. If CL is a good deal where you are, use it - otherwise you're limited to big-box stores and rural tool/tack stores like Tractor Supply and Lowes.
How Big/How Much HP- refers to volume and power, and is bounded by how much space and power you have to feed the machine as well as your needs. I could get 220V easy enough, and wanted to stay around $500. Like I said, 60 gallons is considered a minimum. By the time you get to 80 gallons, the next step up, you're pushing up to $1000. So, 60 gallons it is. This also means the compressor will have a 3.7 or 5 HP motor. That's Fine for my needs. Added a220VAC/30A breaker and outlet for it as well while getting the house electrical service panel replaced.
How much CFM: Cubic feet per minute - a main metric of compressor performance. Bigger is better here. If you're torn between two similar compressors, lean towards the one with more CFM.
Oil- or oil-less motor refers to the type of motor on the compressor. Oilless are cheaper, noisier, and short-lived. You'll kill it in no time flat if you run it like you need to. Oiled motors last longer and cost more. It's worth it to pay a little more up front here.
Piston- or screw-type pump, If you're shopping the lower end of the range, you won't have this option. Screw type pumps are superior - they generate more pressure with less noise. And they cost waaayyyy more money. IF you can score a good used one, take it. Otherwise, this is a choice you won't have to sweat. Same as single- or two-stage compression. If you're shopping under a grand, you're likely gonna get a single-stage compressor. Fine. There's always some Tool who says 'I got my 200 gallon dual-stage screw-type on Craigslist for $200.' My advice - don't stay up late looking for that deal,
Distribution lines: Lots of discussion here, but it boils down to using copper or iron pipe to move the air around. Do not use PVC pipe, as it could possibly weaken over time and explode into lots of little plastic shrapnel bits. So - PVC bad, Metal good.
I settled on the 60 gallon 3.7HP 11.7 SCFM from Lowes shown above. It was on sale for $450 and I had to rent a uHaul trailer to get it home. Unloading is a two/three man job. Please don't die, it's very, very top-heavy. It's fine for my purposes so far - my biggest issue is that, at a mile above sea level, the pump cycles on and off more often ('higher duty cycle') because it takes more strokes of thin mile-high air to get the pressure back up in the tank. The upside of living in the high desert is very low humidity. Moisture in the air, heated by the act of compression,will condense out once it cools as it travels down the air lines, getting into tools and paint guns. The air needs to be cooled to condense out this moisture and be captured and removed before getting into the lines. I built a manifold out of copper pipe and a cold-water bucket chiller out of a coil of copper pipe in a 5 gallon bucket to pull the moisture out of the compressed air so it doesn't get into the lines and screw up the paint/primers I plan on using.

The air manifold - a single inverted 'U' shape with drain valves in both legs. Had to teach myself how to sweat copper lines here.

The chiller bucket - way cheaper than a proper refrigerated air unit and works great. Intake on top, exhaust on bottom. Water in the bucket - add ice on hot/humid days when priming. Not shown, but there's a drain valve on the bottom.

The Heavies. Now we can get some work done!
There's more, obviously, but these are some the the must-haves if you're going to do a lot of this work on your own. It's a lot of time and research to figure out what you need and why, so I hope someone finds this list helpful.
Comments
Post a Comment
Moderated and checked, albeit infrequently. Humans with real questions get answers, bots with spam get derezzed.