Rear Axle cleaning, painting, and reassembly
The rear axle came out a while ago, and it was clear it needed help. So, my plan is to strip it down and clean it up a bit. The previous owner told me it has 3.89 gears in it and it drove fine, so I'll open it up and see what it looks like - but I have no plan to rebuild the differential if it doesn't need it. Someday, I may want lower gearing, but I want to get through the rebuild first. A 3.89 rear end with my wide-ratio toploader means this thing will have plenty of oomph off the line, but will be spinning too many RPMs on the interstate to want to go very far. The drum brakes that are attached to the rear end are in serious need of a rebuild, so that will get it's own (AWESOME!) post.
This post will take us all the way through the rebuild. Again, no gearset changes or any craziness like that. So, what exactly needs to be done? Well, we have to remove the brake drums, the axles, the brake assemblies, get the axle bearings and wheel studs replaced, the housing and the gear carrier need cleaned and painted, the brakes rebuilt, the brake hard lines bent and replaced, the axle seals replaced, and so on. Don't worry, I made a list ;)

My plan - "as-executed" - for the rear axle rebuild. You can see the fenders are also in the flow, and whoa, what a trip those turned out to be!

The 'before' shot. Come back to this once you've gotten to the end ;)
The differential gear carrier in the center there (also called a 'center chunk') is where the gearset lives. Thats what turns the spinning driveshaft motion into spinning wheels. Nasty looking thing. But I'm keeping it - the Ford 9-inch rear end is supposed to be one of the toughest out there.

The backside shot. You can see the leaking fill plug has left a stain, but look at all that surface rust an road grime as well.

Drivers' side drum brake assembly. The bracket waving around in the air is the brake line distribution block, splitting the brake fluid off to each wheel. It's supposed to be attached the the axle.

This is the vent for the axle. It was plugged up, so naturally the axle fluid gets pushed out somewhere else under pressure - namely the ends of the axles, which could get into the brakes, and now it's a project. Interesting that this vent is clipped in place and not screwed in place. This is one of the clues that tell me this rear end came from an older Ford car and isn't original to this one.

Pry off the Passenger Side drum - easy enough - and we find spider webs, nests, and carcasses. Remember the bug-bombing post? This is why we did it. And look at those brakes!

Drivers side brake drum. Also shown are wheel spacers that were installed. Not going to keep these, I hear too many horror stories of WFOC with these. (Wheels Falling Off Car).

Much more work to get the drum off this side. Hammer persuasion needed. Metal-on-metal shock help break the rust bonds holding the drum in place. That hole in the axle face provides access to the axle bolts. Turn, unbolt, repeat.
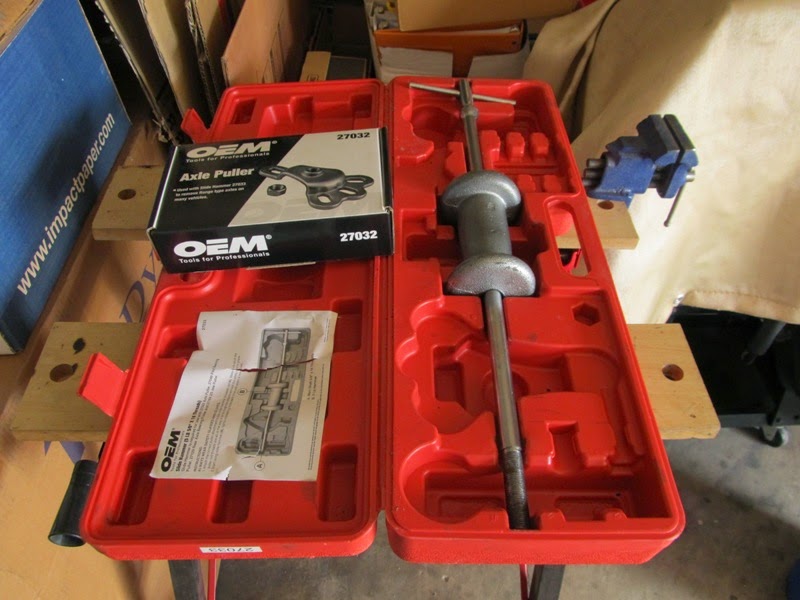
Tool Time! A slide hammer kit like the one shown is used to pull the axles out of the housing. Autozone had the slide hammer and the axle puller for rent.

FIRST remove the axle bolts, THEN attach axle puller foot to lug nuts, THEN slide hammer that axle out. (I got the order correct here 50% of the time)

Here's an axle popped out of the housing. Two or three good whacks and it comes out.

With the axle out, we can clearly see how bad the brakes are.

Axles out and ready to go to the shop for new bearings (those round things clamped on near the bottom of the axle) and new wheel studs, since several have stripped threads.

Disconnect the brake line and the drum assembly pops right off there.

"Get yourself a box...Get a cardboard box...."
Brakes will get rebuilt later.

Drain out the 30 year-old fluid. Smells like death. Tastes worse.

There was so much muck on here, I started with scrappers and scrubbing pads. Remember all the crud under the floor? A lot of it ended up on here as well.

Not one to miss a chance to overcomplicate things, I decide to attempt to media blast the axle in my driveway....

...with a Communist Harbor Freight media gun. What a hopeless optimist I turned out to be.

After as much mess and noise and dust as I could tolerate, this is where we ended up. Better, but not done yet.

Yay! A Mess! Hear me now, understand me later - media blasting in your driveway will make a bigger mess than you thought possible. I'm saving as much as I can so when I get a blast cabinet I can make use of it again. I'll never do this again.

I had to finish the cleanup with a paint stripping disc on a die grinder. Now it's looking better.

Removing the differential is a great way to hurt yourself. That sucker is heavy. Seriously, you may lose a vertebrae to this task if you are not careful. Think of the diff as an 80-pound (not kidding) kettlebell with a poor handle. Also, those studs it mounts on are not perfectly straight, so it gets stuck while coming off. An engine hoist or crane would make this safer. Don't worry Mom, I'm fine. (I made your grandson do most of it.)

After the diff is out of the way, clean the inside and the gasket mating surface. (Check out that factory marking '3' in there - like a time capsule!)

This thing needs some work as well.

Removing the axle seals is easy - use that same slide hammer kit and the axle puller attachment as shown and - pop - out it comes. These, like all rubber pieces, should be replaced every 30 years. One of mine was leaking due to the previously mentioned blocked vent line.

Textbook maneuver. See how easy this looks?

Clean the axle mating surfaces here as well as the seal mounting surfaces. Also a good time to run some rags through the tubes to remove any build-up of gunk in there.

New axle seals, available at any auto parts store. Take the old parts with you to be sure. You need to match inner and outer diameter as well as thickness. This shot shows part numbers for your enjoyment.

Driving in the new seals using some tools, including that super-handy slide hammer again - this time with an axle seal installer-pusher thingy.

Tip: measure the distance the old seal sits at before pulling it out. Then you'll know for sure where the new one goes.

In daylight, the housing needed more cleanup work. So, I used same stripping disc and die grinder. Worked great.

Mixed up some SPI black epoxy primer and shot the housing and my new engine crossmember and floor support (not shown). 12 oz. mixed did two coats for all of it. And I love the way it looks. Seriously, just look at it!

Here's the business end of the differential gearset. Very cool. Why is it called a 3.89 gearset? If you were to count them, you'd find 35 teeth on that thing. The pinon (not seen in this shot) has 9 teeth.
35/9 = 3.89. Also, a good rule of thumb - the thicker that big gear is, the higher the ratio likely is, and the worse it'll be for your gas milage. However, for muscle cars, gas milage is inversely proportional to fun! All the bearings are free of slop, there's no noise or friction when I turn the yoke, so we'll leave it as-is and see how it goes. I got a quote for a new 3.50 gearset, but $500 was just too much to swallow for a part that may be perfectly good for now. The modular nature of the Ford 9-inch housing makes it easy to swap later if I want. For now, just clean up the gasket surfaces and cover the gears to keep crud out.

My high-tech differential holding fixture. Let the degreasing begin.

Another random sideways picture. Whatever. You can still see how much cleaner it is now. You really have to degrease this thing well or the paint won't stick. I used wire wheels, degreaser, scrub pads and lots of elbow grease.

Chemicals used, left-to-right: SPI waterborne wax & grease remover to clean all painted surfaces, Rustoleum clear for the yoke collar, Duplicolor primer in a nice flat red-oxide color that looks factory to me. I'm interested to see how well it'll hold up. [In hindsight, I probably should have used my SPI red-oxide with an added reducing agent to make it less glossy. Next time, perhaps]. And VHT high temp cast iron metallic paint. Don't need high temp paint necessarily, but that's how it comes.

First, paint the yoke, then the collar, then the carrier housing. The whole strip-clean-prep-paint process took 6 hours. (Just sayin'...)

Axles are back from the shop - new bearings, new wheel studs, and then I painted the plates with that high temp cast iron gray for a nice uniform look. Note the oval holes in the end of the axle - that indicates the axles have 28 splines at the end that plugs into the differential. This is good to know as axles and diff's come in 28- and 31-count splines, and they have to match. 31-spline axles would have round centers.

New gasket installed on housing after a couple days of letting the epoxy cure.

The differential gets installed with new hardware and torqued to spec's per the shop manual.

Spoiler alert: Here's the new rear brakes installed, along with the new parking brake cables.

Rear view of the finished product including brake hardlines. I may end up reworking the drivers side hardline - I'm not happy with the bends. I had to buy the '65-'66 kit because my housing is shorter than a housing from '67 would be.

Isn't she lovely? After about 34 logged hours of work over a month or so, this thing is ready to be reinstalled under the car once we're ready for it. I've already received new leaf springs and hardware, so the whole rear suspension will be new. This was my first mechanical "rebuild", and it was a blast. I can't wait to get to the rest of it!
Parts list:
Brake line kit
Brake distribution block
Axle vent kit
Wheel studs (10)
Axle bearings (2)
Axle oil seals (2)
Axle-to-Brake Assembly gaskets (2)
Axle housing-to-Brake Assemble gaskets (2) - yes, these are different
Differential housing mounting hardware kit
Paint
SPI Epoxy primer
consumables (brake cleaner, rags, pads, diff fluid, etc)
Comments
I'm curious to know how the red oxide duplicolor has held up? I'm debating on what to use on my third member.
If you have any plans or sketches for your rack, or other things you have built... might be nice to post them too.
Great Job and Great Blog; I'll definitely keep coming back.
Post a Comment
Moderated and checked, albeit infrequently. Humans with real questions get answers, bots with spam get derezzed.