Rear drum brake rebuild

After tearing down the rear end, it was clear that the rear brakes on the Mustang are in pretty rough shape. They're covered in rust, grease, dirt, and on one side, and one brake shoe was fused to the brake drum. The drums are mismatched, and there's no way to know how old the hardware is. The best bet is to totally strip them down and rebuild them. But I need to figure out what kind of brakes should be on the car, what parts are actually on the car, and which parts I'll need to buy to rebuild them.

Here's the left side brake assembly, once the axle was pulled out of this side. Compared to disk brakes, drums have a lot more moving pieces and things to inspect. The pads (called 'shoes') are held in with several springs and actuated by hydraulic pressure from the wheel cylinder at the top. On top of all that, there's the parking brake hardware in there as well. Believe it or not, most of these parts are considered 'serviceable' and are meant to be replaced at some point. I figure since these parts are at least 30 years old, it's long overdue here.

Before tearing it apart, I took some measurements of the shoes, the drums, and tried to figure out what color the springs were - they're color coded depending on function and, sometimes, by year or size of the brakes they work with. Here, the shoes are showing 2 inches wide.

The drums that came off the car are mismatched. Maybe one of them is right? The measure 10 inches in diameter - so with the 2 inch shoes, it looks like I should order parts for 10" x 2" brakes. Right?...
Not so fast. While the size of the shoes and the drums are a good clue as to what size brakes should go back on the car, the real answer lies on the backing plate. The backing plate is the big round plate that all the brake hardware, including the shoes and springs, mount to. The backing plate should have a part number on the back side (facing the differential) that will help decode what size brakes should be assembled on those plates. This helps me figure out what parts to buy as well.
As it turns out, neither of those drums are right for the car.

Here's the backing plate before disassembling the brakes. Hard to see anything on there, but the part number is at the left center of the backing plate. (the parking brake cable at bottom right faces the front of the car).

Here's a close-up of the drivers side backing plate part number: 70867, which is for the Kelsey-Hayes 10" x 1.75" drivers side brakes. The passenger side part number was 70866, also 10" x 1.75" (a matched set!)
These brakes can be found on various Fords, including Mustangs, on either 8 or 9 inch rear ends. It's entirely possible these are the original brakes for the car even though the rear end housing is not. Now when I look through the catalogs or visit parts stores, I know what to get.

Most of the time when you rebuild rear drum brakes, you just have to work around the axle. I'm going to do a total tear down, so in some ways, this should make it easier - I'll work on bench instead of hunched over and trying to look around the axle end. I'll replace all the consumables and clean up the keepers.

Here's the tool set needed for disassembly: a drum brake kit (includes a spring puller, spring compressor, and a pry bar), some basic hand tools, Liquid Wrench, brake cleaner, and the Ford Service Manual. Oh, and a nice, well-lit place to work.

Blamo! Here's the brake assembly, all disassembled and, for extra credit, all parts laid out in the correct relative position and orientation. Sort of a 3D illustrated parts breakdown. Also a sign of some sort of sickness, I'm sure, but I cannot help myself.

Here are the parking brake lever and spreader bar all stripped down. These I'll keep and repaint - if you look closely, you can see the Kelsey Hayes (KH) part numbers and Ford stamps.

Parking brake lever and spreader bar repainted with high temp VHT cast iron paint. I doubt the high temp version is needed, but that's what I found on the shelf.

Backing plate all stripped down. I used my angle grinder and a wire wheel, and then a cordless drill with a wire cup set to get into the little nooks and crannies to get it all clean. A blast cabinet would have been much easier.
Now here's a fun tidbit that you may not realize if you don't have the Ford service manual, or have never fully rebuilt a drum brake before. You'll notice there are six rectangular flat pads around the inside perimeter of the backing plate. I wish I had a better shot, but if you look closely, you can see there are grooves across several of those pads.
The brake shoes rest and ride on these pads - when the brakes are actuated, the shoes move out against the drums on these pads. Over time, if not properly maintained, these pads get grooved from the shoes, causing the shoes to get hung up in the grooves and possibly start wearing the shoes unevenly. This is sub-optimal performance for brakes. So we need to fix the pads by welding new metal into the grooves and then CAREFULLY grinding/sanding the pads flat, as shown below.

Freshly filled and ground shoe pads on the backing plate.

Close-up of a freshly filled pad. Three or four pads on each backing plate needed to be filled and ground. Did I mention how much I love my welder?

Painted the backing pate with high temp VHT satin black. These three parts are the only things that were reused for the rear brakes. All the rest of the parts will be new.

I'm not going to show the step-by-step for reassembly - that's what the manual is for. But here are all the new parts for a a rebuild all laid out and ready to go. the shoes and chemicals are local parts, the rest (Springs, wheel cylinders, and the link pins) were ordered online. I was surprised how hard it was to find some of this stuff locally. In the end, most of came from NPD, and it's nice that they just fit like they were supposed to.

All rebuilt, clean, color-coded, and should work like it's supposed to. Nothing like shiny new hardware to make you feel all warm and fuzzy inside.

Compare the rebuilt side to the untouched side, and you can really see a difference. I guess I should emphasize here that you should only take one side apart at a time and use the other as a reference in case you get confused. They're just mirror images of each other.

Same exercise on the drivers side assembly...

Blow it all apart, clean and paint the few kept parts, and put it all back together.

Both sides rebuilt and ready for installation onto the rear end housing. Overall, each side took about 6-8 hours of actual work to strip, clean, paint, and reassemble, but there was at least that much or more in research and parts hunting. You should be able to do all this in a weekend once you have all parts in hand.

The brake assemblies go on the rear housing over a gasket, then the axles are installed over another gasket and bolted to the housing,..
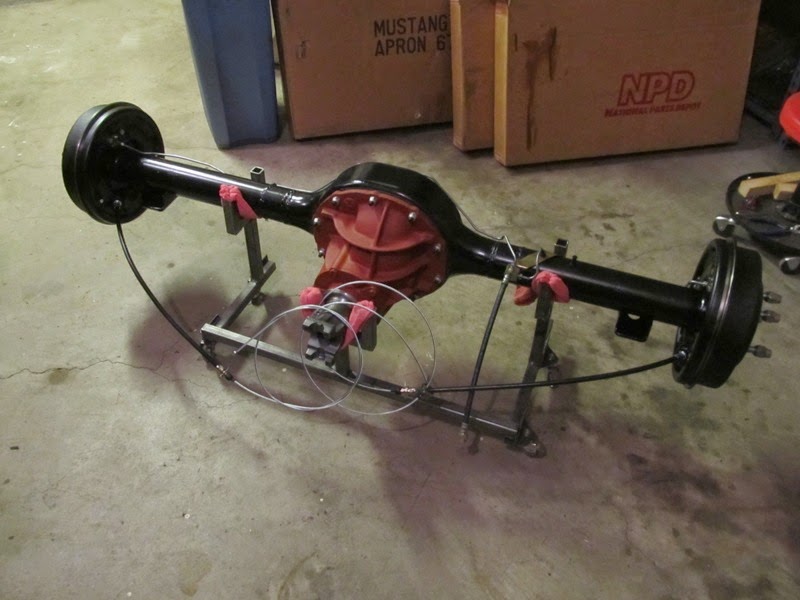
..and the drums are installed over the axles.
The complete assembly is ready to be attached to the car - once I decide on and order a new rear suspension setup. But that's a post for another day.
Comments
Post a Comment
Moderated and checked, albeit infrequently. Humans with real questions get answers, bots with spam get derezzed.