Removal of the steering box/column and the last brake bits
Just about done cleaning out the engine bay. The last few pieces come out and get boxed up. After this, I'll be ready to get serious about thinking about how the plan for the frame jig.
Here's the area we're working on - drivers' side firewall. This is where the power brake booster (the blue thing - a Midland-brand booster shown here,) and master cylinder (the rusty thing on front of the booster) are mounted. Below that is the steering box. Of course, removing three components means a lot more than just three components.


Here's the area we're working on - drivers' side firewall. This is where the power brake booster (the blue thing - a Midland-brand booster shown here,) and master cylinder (the rusty thing on front of the booster) are mounted. Below that is the steering box. Of course, removing three components means a lot more than just three components.

Just take a moment and see the dirty, grimy coating all over the engine bay and the generally worn-out nature of the parts. Drives me batty.

Here's a top down view of the master cylinder - dual reservoir for the disc brake cars. Just two hydraulic lines to disconnect here.

Once the M/C is out of the way, the hard lines and the brake distribution block are visible on the apron.

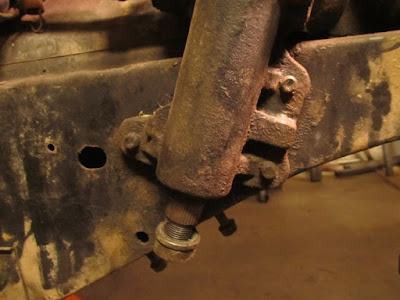
Here's the steering column attached to the steering box via a 'rag joint'. On earlier cars, this shaft is over three feet long and goes all the way into the steering column up to the wheel. Non-collapsable, is sometimes referred to as 'Spear-o-matic Steering." Fortunately, my car has the later-style short shaft steering box. Just loosen the one visible bolt on the rag joint...

...have your flexible apprentice remove the bulkhead bolts holding the column to the firewall and the lower dashboard...

...and the column pops (almost too) easily out of the rag joint.

The steering box is held to the frame rail with some good, sturdy thru-frame bolts (3 to be exact).

And it's out. The rag joint needs to come off before any rework/rebuilding.

Here's the factory tag on the top of the steering box. Mine has code SMB-E which means 16:1 ratio (quick, GT and/or Power Steering), 1 inch sector shaft (harder to find parts).

I set the steering column aside for later consideration. It's a Tilt-Away unit - factory tilt steering that would use a vacuum system to pop up and away from the driver when the drivers door is opened. I vaguely remember seeing something like this as a kid at some time. Of course it's kind of a rare option, and so naturally it's hard/expensive to get parts for.

The brake/clutch pedal assembly out of the car. That large spring should've come out before the assembly was removed. Scared the stupid right out of me when it let go on the way out. It clearly had an appetite for human flesh, and only dumb luck kept me from feeding it. Remember, springs are just potential energy bombs - the trick is to figure out if it's armed or not!

Here's all the fiddly bits that make the parking brake work from handle assembly all the way down to the first floor-mount lever. You took good notes during disassembly, right?

Pull out the brake hard lines and Blamo! Naked firewall! I'm already excited to get in there with an angle grinder and get it all cleaned up.
This is a little out of order, as I think I did this after the car was actually on the jig, but it makes more sense to do it in this order. (That's like a teaser trailer there - I just told you the car is already on a jig! So I'm not just yanking the internet's' collective chain! How exciting!)
Really, jig design and fab is next - I swear. There really are no excuses anymore.
Comments
Post a Comment
Moderated and checked, albeit infrequently. Humans with real questions get answers, bots with spam get derezzed.