Shock tower bracing - like a Boss!
I'll show a couple items here - I have a single crack in the drivers side shock tower that needs to be repaired, and then I'm going to install some new/non-stock braces in the bottom of the shock towers that are inspired by Ford's factory Boss 302 in the late 60's.
The shock towers in the 67-68 mustangs have a tendency to crack due to fatigue and abuse. The earlier ('65-'66) and later ('69-'70) shock towers are different designs and different shapes, and less susceptible to this issue. While some cars have cracks that look like the San Andreas fault that you can see daylight through, all I found is one little crack in the bottom of my drivers side tower.
Just to reorient ya'll where we're working -

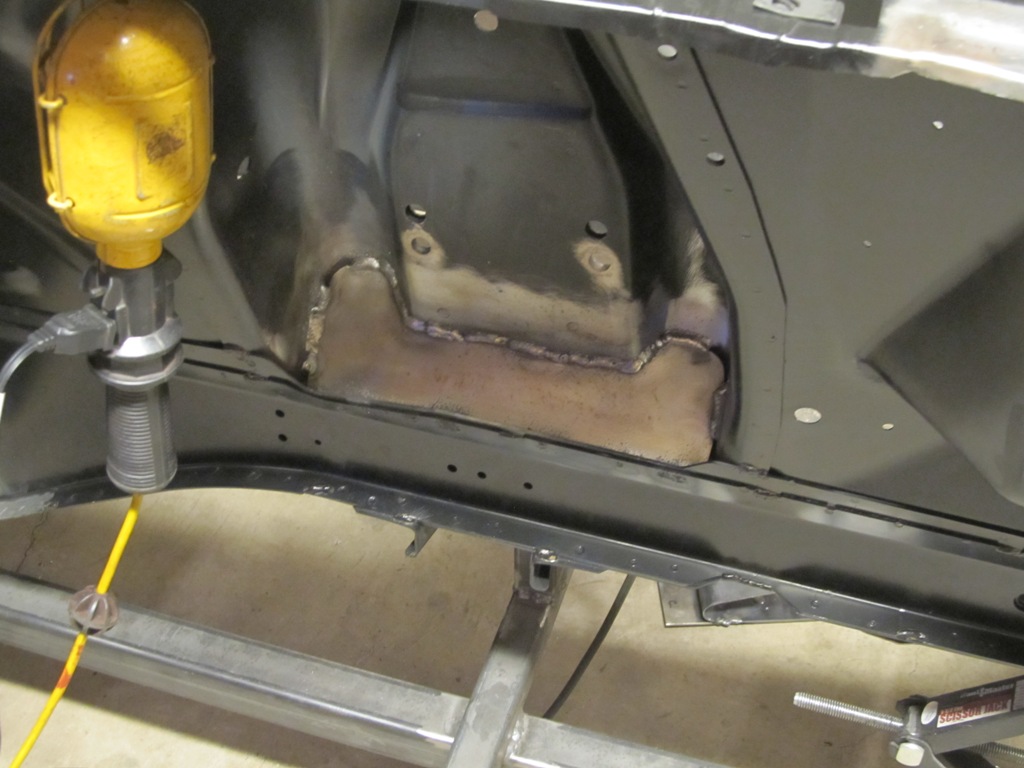
 Way down low in the pocket where the shock tower meets the frame rail, there's this little crack. It goes all the way through to the other side. My passenger side shock tower is brand spanking new, so it has no cracks, and in fact has a lot of extra welds and bracing to provide extra strength in this area.


This pretty much concludes all the metal work on the car forward of the firewall. It's now ready for stripping, epoxy primer, and then installation of suspension, steering and brakes. Which is all coming up next...
The shock towers in the 67-68 mustangs have a tendency to crack due to fatigue and abuse. The earlier ('65-'66) and later ('69-'70) shock towers are different designs and different shapes, and less susceptible to this issue. While some cars have cracks that look like the San Andreas fault that you can see daylight through, all I found is one little crack in the bottom of my drivers side tower.
Just to reorient ya'll where we're working -

The drivers side shock tower is in the middle there. Way down in that pocket is where the crack is hiding, but the metal had to be stripped bare to find it.


First, I drilled holes at the end of the crack (called a stop-gap), and used a dremel cutting wheel to make a little groove down the crack on both sides. The stop-gap holes keep the crack from spreading, and the grooves let me weld deeper in the metal for proper penetration.

Blamo. One crack sealed up. I cleaned up the welds on the other side since they'd be visible in the engine bay otherwise. On this side, though, I'm about to seal this area up forever with a brace, so I stopped trying to make it pretty. Those compulsive behaviors must be kept in check. If I had more cracks, I'd just follow the same procedure for all of them.
Now I need to install some additional bracing in the pocket to keep this from happening again. Ford developed a solution back in the day during the factory-backed Boss 302 racing program. Really all it needed was some extra metal 'dog-bones' that help brace the shock tower to the frame rail to prevent flexing under load which caused the the stress fractures like the one I just repaired. In the end, the fix is just a properly sized piece of Sturdy Metal triangulated in the right place.

I had to trim both braces a bit to get them to fit per the drawing, but it's easier to trim these than fabricate them directly out of metal if you don't have the tools for it. Primer is applied to the inner facing side of the braces.

Primer is also applied to in the areas that'll never see the light of day again.

Fit testing with the new upper control arms in their newly located mounting holes from the previous post. The UCA should not hit the brace, as the outside edge of the brace goes inside that pocket.
And after than it's just a matter of welding them in. In this video from West Coast Classic Cougar, they suggest at least 80% of the perimeter should be welded for proper strengthening benefits. I got closer to 90% coverage with good penetration, but I decided to leave open gaps at the corners to allow me to blow crud out if I ever felt the need. There are still drain holes in the backside as well, so this area shouldn't accumulate standing water and muck during normal use.
You can go nuts welding every seam in the front end of the car if you're going autocrossing or drag racing - I'm not, I just felt like this mod helps correct a design weakness inherent in the original car.
Comments
Post a Comment
Moderated and checked, albeit infrequently. Humans with real questions get answers, bots with spam get derezzed.