Engine bay priming
Lots of cool before and after shots in this one, too!
After all the disassembly, the documentation, the measuring and cutting and welding, I'm finally ready to prime the engine bay with a uniform coating of SPI epoxy primer. Few things float my proverbial boat like clean, uniform surfaces.
After all the disassembly, the documentation, the measuring and cutting and welding, I'm finally ready to prime the engine bay with a uniform coating of SPI epoxy primer. Few things float my proverbial boat like clean, uniform surfaces.
Ideally, the primer could be the final top coating in the engine bay. It's chemical-resistant (so brake fluid and gasoline won't eat it up) and has UV inhibitors so it won't chalk up on its surface after being exposed to the sun (which is a real possibility of a few summers of high desert hoods-up car shows). It's really just depends on how well I can get the primer laid out in the engine bay. It's a daunting assortment of nooks and crannies that need to be sprayed just right, so the pressure's on.
Tools used for this effort are the usual suspects: the angle grinder with wire wheels, the wire wheels used in the cordless drill, and the 3M strip-it disks on the pneumatic die grinder.
 Here's what the engine bay looked like way back in June 2013 after the engine was pulled out and pressure washed. The discoloration is from what appears to be a 'repaint' of the engine bay with rattle-can spray paint over the original finish. It appears there wasn't enough surface prep or masking of parts as brake lines and and bolt heads are all covered in black spray paint. As a result, you get 50 shades of grey in the engine bay. Clearly, much work to be done here.

 Here on the front apron on the drivers side you can still see a dark spot outline where the wiper fluid bottle mounts No amount of washing or Armor All is going to fix this. It has to be stripped off and redone if I want it to look right.
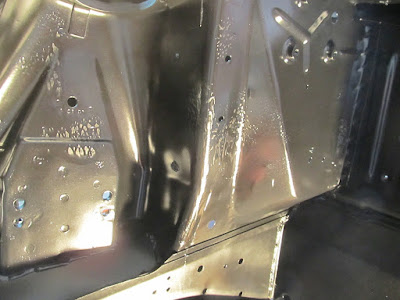
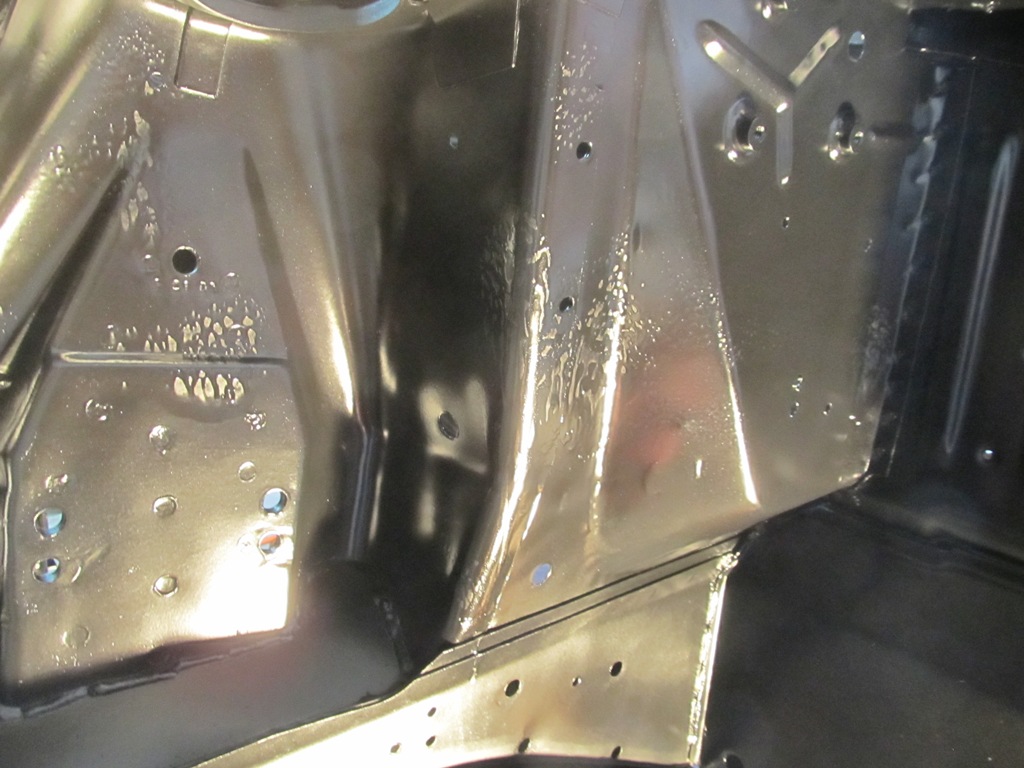
 The firewall is a special kind of awful - there are lots of runs in the spray paint job, indicating it was done while the engine was in the way. This shot gives me the screaming Heebie Jeebies.
 I pulled the last bits of the brake system out of the way and considered my options. I guess I could just wash it off and put the new booster and master cylinder in place and move on. Yeah, right! Let's strip this mess off and make it pretty!
 Not so fast! Often when cleaning up the engine bay, one may find original factory markings on the aprons or the radiator support. This one looks like "94L7". Take time to look for these and document them before going hog-wild on the angle grinder. I plan to replace this one and some others I found after the engine bay is finished.
 I started the stripping while the car was up on the frame jig. Sometimes it's nice to have a fairly mindless task to work on when you're stuck on a problem or, say, still too chicken to start cutting big structural chunks out of your classic car.
 All the old paint clearly has to be stripped off the car, but what about the new metal? Surely it's fine as is, right? Well - maybe. New reproduction parts usually come with some sort of coating on them, either something called E-coating or, more uncommonly, weld-through primer. I'd heard and seen pictures of new reproduction parts having rust underneath the E-coating, which is what my new frame rail/shock tower assembly had on it. If it wasn't applied correctly on properly prepared metal (on the assembly line in a factory in Taiwan...) it could fail to adhere and the new paint job would be toast. Would you risk not knowing what was underneath it?
So I started stripping it off. Almost immediately I found a little rust under the E-coating. Feeling vindicated, I plowed on and stripped the entire assembly. I never found any more rust after that first little section. Oh well. Still the right call in my mind.
After many hours of stripping (20? 30? I sort of lost count), the engine bay is finally ready for priming.


 Once the engine bay was stripped, I cleaned and primed the floor pan, shown in the previous posting. I also primed was the bottom of the frame rails and the radiator support at the same time. Since this is all overhead priming, like the floor, I would need to use my little Lowes HVLP gun, so I just did it all at once. I also used a foam brush to get into the joints inside the strut mounts and the inside of the shock tower structures.
 Here's where I stopped priming the floor pan, right at the transition to the firewall. I figured I'd just overlap the primer at that point so there wouldn't be a big visible transition zone.With the SPI primer, you can recoat over a fresh coat for up to seven days without having to sand it. So I knew once I had the floor done, I'd need to get the engine bay prepped as soon as possible.
 Gotta love the prep work. I'll say it again, this makes or breaks the application of the primer. It must be clean and dry before laying down primer. It took about a full day of wiping and re-wiping every surface to be ready to prime. I killed at least a full roll of paper towels for this job.
 And here's the final product. A clean, fresh, black engine bay. The gloss will dull a little as it cures over the next few days. Oh, one other pain-point with epoxy primer - it must be shot on metal that's at least 65°F or higher, and it must be kept at least that warm for several days afterwards. Thus the 500W heat lamps and the space heaters.


 It's incredibly satisfying to get to this point. I'll need to see how well it cures in a week or so to determine if I need to touch up some spots or not. I may still have the whole thing topcoated in satin black if the sheen is too high. The sheen of the primer should be a little duller than semi-gloss, but that depends on a lot of conditions, and I'm not good enough to control all that yet.
A total of two full coats are on the front end. Seam sealer (NAPA 1k black) was applied to all the necessary seams per the Weld and Sealant manual after the first coat. I used a total of about 36 oz of mixed primer this project.
A confession about improper technique:
So, it turns out I made some mistakes in the first pass that had to be fixed. On the outside of the aprons and shock towers I got a lot of runs in the primer that had to be stripped off and redone. And this isn't just me being picky, it was legitimately gross.
 After the obligatory Wailing and Gnashing of teeth, I decided I made a series of mistakes here. First, not using enough light on the sides. This led to me thinking I needed to slow my gun "travel time" (controlled by how fast I move across the panel when spraying) to get enough on. When the lights were brought over for warming the metal, I could see what I'd done to myself. I'll apologize again to my family for being grumpy that week.


Just rough looking all over.


So I started stripping it off. Almost immediately I found a little rust under the E-coating. Feeling vindicated, I plowed on and stripped the entire assembly. I never found any more rust after that first little section. Oh well. Still the right call in my mind.
After many hours of stripping (20? 30? I sort of lost count), the engine bay is finally ready for priming.

The new shock tower assembly

The new radiator support.


Yep, even the bottom of the frame rails and inside the suspension mounting points are stripped.


"Properly Prepped Panels Prevent Poor Primer Performance"
- Me


A total of two full coats are on the front end. Seam sealer (NAPA 1k black) was applied to all the necessary seams per the Weld and Sealant manual after the first coat. I used a total of about 36 oz of mixed primer this project.
A confession about improper technique:
So, it turns out I made some mistakes in the first pass that had to be fixed. On the outside of the aprons and shock towers I got a lot of runs in the primer that had to be stripped off and redone. And this isn't just me being picky, it was legitimately gross.
Runs and blotches.


All the nasty was stripped off - after waiting a few days to let it cure, of course.


Freshly reshot and seam sealed.
Comments
Post a Comment
Moderated and checked, albeit infrequently. Humans with real questions get answers, bots with spam get derezzed.