Front Brake Kit Installation
Time to install some brakes on the front end. My car came with a factory-looking Kelsey-Hayes disc brake set, and after a lot of thought, I decided this was what I wanted to put back on the car. I could have just restored all my old parts as best as possible, but the price of the parts that had to be replaced and/or professionally cleaned and reconditioned was pretty much the same price as the entire Kelsey-Hayes disc brake set from CSRP shown here. So I bought the kit, and set my old parts aside for someone else who'll need factory parts.
The kit is quite complete, and includes a master cylinder and a power brake booster assembly as well as all the parts that mount on the hubs. It even has an adjustable proportioning valve in it. This post will just cover the wheel side, and I'll leave the horror of brake lines and such for a later post.
Here's how the kit shows up. Ah, new parts!

Three boxes full. And they're heavy.

Here's the kit. It even has a power brake pedal (if you order the Power Brake option, I guess).

Look! I packed my first wheel bearings! I had to buy a tool from NAPA that looks like a big syringe and those white plastic discs that basically squeezes in the kit-provided grease into all the nooks and crannys of a bearings race and rollers. You can also use the old 'scoop in the palm of the hand' technique that the old guys use, but I like knowing I got them nice and greasy. The big one is the inner bearing and the little one is the outer bearing that goes on after the rotor is installed.

These are two part bearings - races and rollers. The races for the bearings are already pre-installed in the rotors. The rollers are the ones you grease before installing them into the races. The instructions say to inspect the races closely before installing the rest of the bearing and putting them on the car. Mostly, you're looking for metal burrs and contaminants that'd grind a loaded bearing into oblivion...
However, on one of my inner bearing races, I found an actual crack (!). See if you can find it in the pic above. It had to go, despite my strong desire to wrap this project up in day. On my next day off, I sourced a replacement from NAPA and a local shop swapped them out for me. Total cost was about $20 for this detour, but it saved me a bunch of trouble down the line. Take the time and really inspect new parts.
Now we're ready to start putting it together. There's plenty of places to find detailed installation threads, so I'll just show the highlights.

This is where we start: a bare spindle.

Caliper bracket and dust shield are on.

Here's the new K/H-type calipers. There actually marked CSRP in the castings, but when I hold them to my original K/H calipers, they're a good match.
I cleaned and reused the old bolts the connect the caliper the the bracket because they have holes in the heads for safety wiring, whereas the new bolts that came in the kit are just bolts.

Mounted the rotor and the dust cap (oh, that d@#! dust cap! Beat it harder with the hammer!)

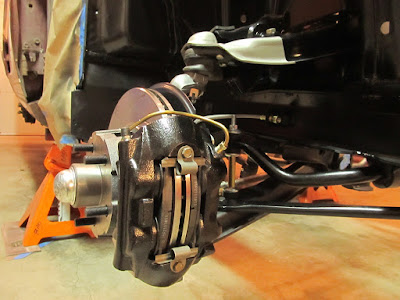
Caliper mounted on the front of the rotor. Mmmm, sexy!

Brake pads go in the front here. The pads ride on rails on the caliper and are squeezed in by 2 pistons on both sides, making this a 'fixed' caliper design as opposed to a 'floating' caliper you'll find on later cars ('68 and up). I can't say one's better than the other, but I can tell you swapping pads on this setup will take less time than it takes to pop a bag of popcorn in the microwave.
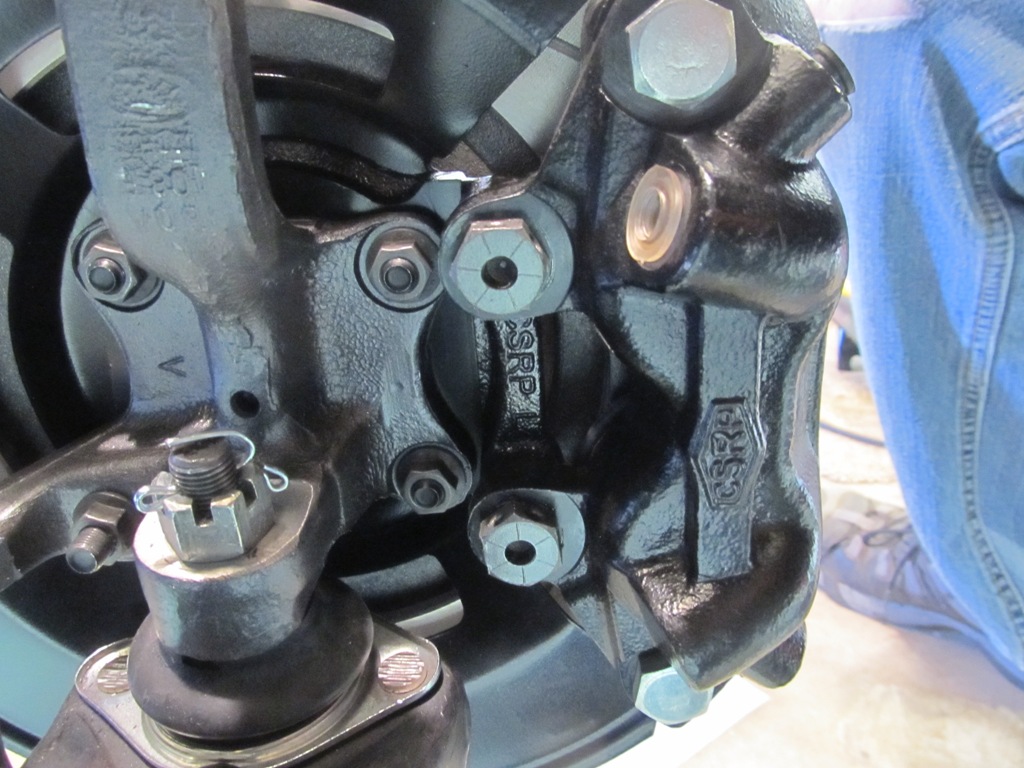
The backside of the brakes. CSRP castings visible on brackets and calipers.

Crossover tube installed on the caliper. It allows brake fluid to flow to both sides of the caliper when/if the brake pedal is ever pressed.

Here's how the old brakes looked before disassembly. Same design, just old, non-functional, worn, and grimy.

Here's the full kit - steering, suspension, and brakes, oh my!

Oh, and where we started back in the day. I know it just looks like I took a pressure washer and gallon of soap to the car, but everything on here is now either new or restored.

Starting to come together!
Comments
I'm literally about to do the VERY same job on my 68. I bought the CSRP set up as well... All it bolted on and secure.. ran all new hard lines as well. This weekend will prime the master and bolt it one and go from there to bleed. I'm hoping I have everything snug and secure..
If you have anything that you think is good advice, I'd love to hear it as I'm about to dive in head first..
love the blog. great reference material.. I use yours as well as another guy (https://my67fastback.wordpress.com/)as a guide.. It's been very helpful.. THANK YOU!
I can sympathize with your previous efforts before saying it's checked off your list. I'm almost ready for round two in pressure/bleed testing. I had a couple of flares leak. They looked fine but they leaked regardless of how tight I made them. hoping I didin't mess up the inside fitment of the receiving end of where the line attaches.
What was your situation with leaks? Did you simply take it back apart and re flare, hoping for the best? Did you use copper conical crush washers?
My leaks were located on a fitting at the distribution block, odds being there are 5 ports, one would leak of course, and the rear brake line hose. Both brake line fittings on that rear block leaked no mater what. I decided to order a new rear hose as the first one was a cheapy.. hoping a USA made one will fix the prob. once it arrives I'll give it yet another try.
Post a Comment
Moderated and checked, albeit infrequently. Humans with real questions get answers, bots with spam get derezzed.