Brake Bits, pt. 3 - Brake lines, Pedal Assembly, and Booster/Master Cylinder installation
The brake lines are in. Finally. I'm so tired of messing with these things.
My superstitious nature means I can't post something until I'm pretty sure I'm done with it for fear of jinxing my progress. The installation of new brake lines has been hard, time-consuming, and frustrating, so it's taken the better part of three months off and on to get to a place where I can call it 'done'. But I think we're finally there. I also have a deep-seated contempt for plumbing work, and hydraulic brakes fall in that category.
You know what brake lines are. I won't belabor the point. Folks who live in the salt belt apparently have to routinely replace brakes lines that rust out from winter salt exposure, but here in the sunny southwest, that's not a problem, so I'd never done anything with brake lines before. Let me highlight some specifics I had to learn how to do for this task:
Tools I had to buy or rent for this task:


My superstitious nature means I can't post something until I'm pretty sure I'm done with it for fear of jinxing my progress. The installation of new brake lines has been hard, time-consuming, and frustrating, so it's taken the better part of three months off and on to get to a place where I can call it 'done'. But I think we're finally there. I also have a deep-seated contempt for plumbing work, and hydraulic brakes fall in that category.
You know what brake lines are. I won't belabor the point. Folks who live in the salt belt apparently have to routinely replace brakes lines that rust out from winter salt exposure, but here in the sunny southwest, that's not a problem, so I'd never done anything with brake lines before. Let me highlight some specifics I had to learn how to do for this task:
- Identify which pre-bent hardline set I needed for my car (not as straightforward as expected)
- Modify said 'pre-bent' hardlines to fit my car.
- Figure out how to use a flaring tool to make my own double flares on my pre-bent lines
- Create custom-bent brake lines from straight stock when 'pre-bent' lines are so far off as to be useless
- Accept that 'pre-bent' lines are not going to just drop in
- Bench-bleed a master cylinder
- Fill and bleed a full brake system from scratch
- Troubleshoot leaks in brakes lines and wheel cylinders
- Disassemble and reassemble drum brakes on the car (unlike on the bench as I'd done earlier)
Tools I had to buy or rent for this task:
- Flaring tool set from Autozone (3x to get one that worked properly)
- Several line wrenches (3/8" and 7/16" AND 10 mm (new wheel cylinders!) )
After the hardlines were in, I installed the brake pedal assembly and the new master cylinder and booster assembly.

I bought the AMK brake line kit from NPD since all my hardware was a mess. The cleaning time versus cost of the new kit made this an easy choice.

Here's a shot of a double-flared brake line end on one of my 'pre-bent' brake lines. The double flare is the little bubbled end of the brake line that forms the seal between a line and the seating assembly. The two sizes of flare nuts on my lines are shown here - 7/16" and 3/8". I had to cut off and shorten or change nuts on several of my lines (seriously, the new lines had the wrong nuts to fit on the original distribution block) , so I had to learn how to do this. It has to be done right or it will leak - slowly, for sure, but enough that you'll have to take it apart to redo and reinstall.
I'm not going to spend a bunch of time talking about making your own double flared brake line ends. The Interwebs are full of tutorials, videos, and details, all of which I used to figure out how to do my own flares. In the end, I had to cut off and re-flare 5 of my line ends. Free advice on forming your own double flares:
- Get a good tool - Autozone has them for loan, and they work, but I had to go through three of them to find one that didn't have a bent die for the 3/16" line that I have. If I were doing a lot of lines, I'd invest in the Eastwood version, but for my purposes, this was
- Use brake fluid to lubricate the line and die when forming both steps of the flare.
- Practice, practice, practice!

"Pre-bent" line for a '67 w/disc brakes - connects distribution block with front right wheel.

New line on firewall.

The line is one continuous piece to the flexible line.

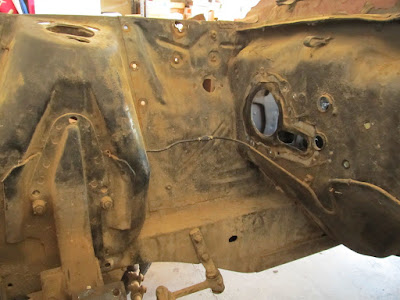
Here's a shot of the line that came off the car - that compression fitting is NOT supposed to be there! That's less than ideal, but I get it - replacing the whole line as a maintenance task has to be a pain. But I do wonder why it's even there in the first place. (And, wow, look at that mess this used to be!)

Here's the line coming through the shock tower and into the flex line fitting. This line was an inch or so short as shipped, so I had to pull it out and rebend this end to get it to fit.

The line in the 'pre-bent' kit for the front left wheel was not even close in bends or length. So I used a length of coat hanger wire to form a proper template, and picked up a piece of straight stock line from NAPA. Of course, that line was too long and one of the nuts was the wrong size, so I had to cut off one end, pull off the wrong nut, install the right nut, cut the line to the correct length, flare the end, and bend to the shape of the template. This took an embarrassing amount of time.

Here's the rear line and both front lines installed in the distribution block. I won't actually use the rear line in the block like this, as my new brake kit includes an adjustable proportioning valve for the rear line and it has some special plumbing.

Bench bleeding the master cylinder. The loop lines came in the CSRP kit. Basically, just hook up the lines to the outlet ports and set them into their respective reservoir bowls, fill with new brake fluid, and manually cycle the cylinder rod with a large screwdriver or other pokey-like device until no bubbles are coming out with each stroke. This is 'must-do', not an optional step.

Once it's bench-bled, the new master is bolted to the power booster.

Now it's time to install the recently restored brake/clutch pedal assembly!

Two bolts on the firewall and two bolts to the dash panel are used to hold the pedal assembly in place so the booster can be installed.

That's nice. It looks better in person, my camera doesn't do it justice.

Before I install the booster and master cylinder, I hooked up the proportioning valve on its bracket, and got the hardlines all plumbed into their respective places.

And then the booster and master cylinder go in. This is a two-person operation, one to hold and guide in the engine bay, and the other under the dash to line up the booster push rod with the brake pedal.

Here's the final installation. Half of these lines were leaking once pressure was applied, but most of those leaks were fixed by tightening the fittings just a little more than I thought they should be.

Looking up at the brake pedal and brake light switch connection to the booster rod.

Here's another view of the plumbing for the proportioning valve. I had to get a supplemental picture from Dennis at CSRP to figure out what the final setup should look like - hopefully this'll help someone else as well.
After all the lines were in, I spent a couple weeks chasing leaking fittings (push brakes, find leak, tighten fitting, push brakes again, wait overnight, repeat), plus a bad (new) rear wheel cylinder, tearing apart the right rear brakes to replace said wheel cylinder, and reassembling the rear brakes.
At this point, I was utterly sick of the brakes, but I still needed at least a preliminary test to tell me I had it working at some level. So we pushed the car out of the garage and down into the driveway - I hit the brakes, and glory hallelujah, they worked! And then the parking brake held the car on it's own when I got out! To quote the great Hannibal (Smith), "I love it when a plan comes together."

Now we're getting somewhere!
Comments
Also, I think I forgot to mention - the flaring tool was rented from AutoZone. It took three trips to get one where the 3/16 flare wasn't all beat up and would make a good flare.
Post a Comment
Moderated and checked, albeit infrequently. Humans with real questions get answers, bots with spam get derezzed.