And...we're back! Cleaning up the edges and test fitting the rear wheelwell.
I got the garage back last week, so after a few months off I'm ready to get back at the Mustang again. I still don't know how to install a quarter panel, but it's time to keep plugging along anyway.
Now that the quarter panel is mostly gone, I can see and clean the mounting surfaces for the new quarter panel.


Now that the quarter panel is mostly gone, I can see and clean the mounting surfaces for the new quarter panel.

The leading edge of the panel covers the B-pillar. A light coating of surface rust covers everything.

Just a wire wheel and some time cleans it up nicely. Don't grind here, there are factory reference points called Master Control Surfaces that you'll want to preserve to line up new panels. (I found that secret detail in the factory weld and sealant manual).

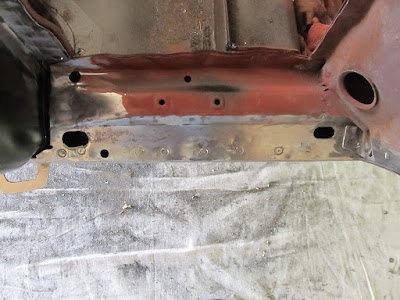
This is the top of the rocker panel where the quarter panel was mounted. Again, surface rust and body caulk, but nothing serious. I'm pretty sure the rocker panels are galvanized, so they should hold up pretty well.

More wire-wheeling and it's clean enough for the next step. Notice where I got a little over-zealous with the spot-weld cutter - it left little circles and thinned the metal there. When I replace the panel, I'll need to place my new plug welds to the side so I don't blow through the thin meal.

The trunk drop-off panel on this side is in bad shape. After stripping it with the wire-wheel, I found a lot of weak and very thin meal over the entire bottom four inches as well as the edges. The top is fine. When I got the car from Brett, there was a lot of oily dirt and debris in here that had clearly been sitting for a long time. I'm not surprised, just disappointed :( This will need to be replaced.

Now it's time to test fit my new outer wheelhouse. The inner wheelhouse is still in place. On coupes of this year, the inner brace is welded to the top of the outer wheelhouse, making replacement fairly easy. On fastbacks, the inner brace is welded to the wheelhouse assembly lip. so replacing the outer wheelhouse is more trouble.

My clever/lazy solution was to drill all the spot welds on the brace all the way through. When I slide the new outer wheelhouse in there, it'll fit it between the lip on the inner wheelhouse and the brace so it'll be easy to plug weld in. Of course, this means I'll have to weld both sides since the holes go all the way through, but whatever. That's future-me's problem.

The new wheelhouse fits in nicely. I had to clean up the inner wheelhouse mating surfaces pretty well, but now the new part just slides in there and is held in place with the tension from the inner brace on top.

Rear view - here you can see the fit at the trunk drop-off.

Front view.
More to come. Next up is more metal cutting and replacement!
Comments
Post a Comment
Moderated and checked, albeit infrequently. Humans with real questions get answers, bots with spam get derezzed.