Rear transition pan metal work, part 2 - Passenger Side pan patches, holes, and cracks
Here's what it looked like when we start. Oily, dirty, and extra holes and screws.

Here's the inside at the same location:

Cleaned up the bottom with Simple Green degreaser, then wire wheels on an angle grinder. Now you can start to see the extent of the damage. I have no good explanation for that flap of metal in the upper left of the pic. My best guess is stress damage from the air shocks.

Close-up of the flap and a lot of the extra holes that need to be filled.

Cleaned up the inside in the same way. In fact, I sort of got carried away with the angle grinder and just kept going...

After it was all cleaned up, I sat and stared at this mess for a couple hours trying to figure out the best way to attack it. "Paralysis by Analysis", they call that. In the end, I just marked the biggest holes, got out my cutting wheel, and went after the worst part.

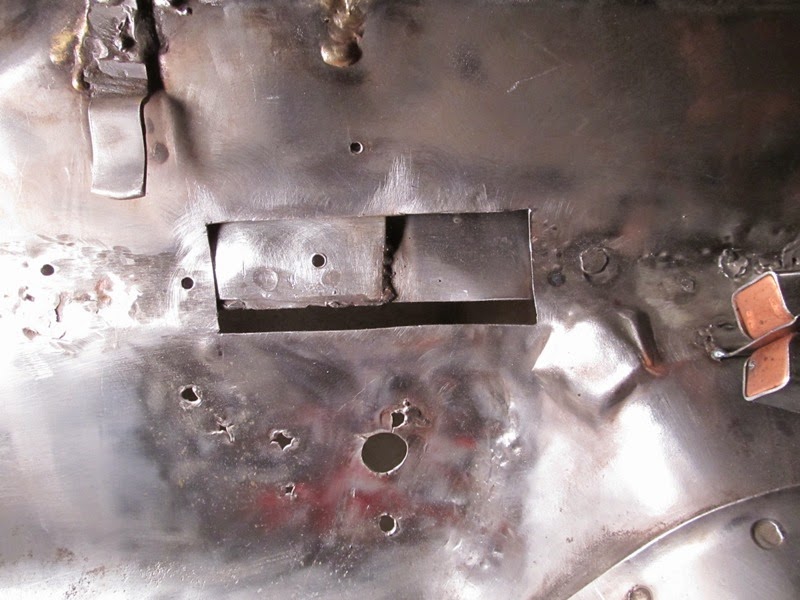
Bad metal cut out...

Bend the flap up and away to make cutting easier...

And, zing! New holes in the floor!

Here are the offending pieces cut out of the car. Save these for templates later. Especially in the case of the bottom one. The top piece has two curves to the surface, the bottom one has FOUR. Much hammering on that patch will be needed to shape it correctly.

Clean the exposed area in prep for welding. MUST be clean for MIG welding when using gas. Prep work here is 90% of what makes this work. Notice the piece of metal I welded to the floor in the right edge of this shot. It's specifically there for the ground cable for the welder. Good, clean ground is part of the prep work.

First patch is in. Went pretty well. It's less stressful when you know no one will ever see it.

Ready for the second patch (see my ground clamp on the right?)
Using the old piece, I mark a bigger-than-needed piece of 18 gauge metal fo the patch.

And, whoop, there it is. What you can't really see well is the multiple curves both horizontal and vertical to get the edges of this piece to line up all the way around the perimeter. I bet I spent 3 hours on this alone. The magnets hold it in place for welding. I use these, but first I'll grind the red paint off the edges so it'll conduct current better for the welder, and be sure to do the tack welds as far away as you can - the magnets will interfere with the arc on the welder. So, tack, relocate magnets, tack again, and repeat as needed. After four or five tacks around the edge, you can toss the magnets.

Patch is in and started to clean up the welds. I guess if I was a better welder, I would have less grinding to do.

Filling the extra holes. The remaining holes are fine, they're for the inner seat belt bracket.

Filling holes and cracks on the backside as well. Didn't need to pull the metal around on this side like the drivers side, so that was nice.

Welds mostly cleaned up and seat belt bracket welded in place (two plug welds from the top side).

There are some subtle dents in the pan for some reason. I hammered some of them out as flat as I could get and will still have to come back and do some final grinding/clean up work. But overall, I'm pretty happy with this area.
Comments
Post a Comment
Moderated and checked, albeit infrequently. Humans with real questions get answers, bots with spam get derezzed.