Fender apron patches - a typical vintage Mustang trouble spot
Patching fender aprons is like chicken pox in these old Mustangs. Everyone gets it, and it leaves scars where you can see them. Most every Mustang will have this issue at one point in its life and it's easy to spot the ones that still need this repair at any hoods-up car show. No amount of spray paint will make this better. The rotten metal has to be cut out and replaced.
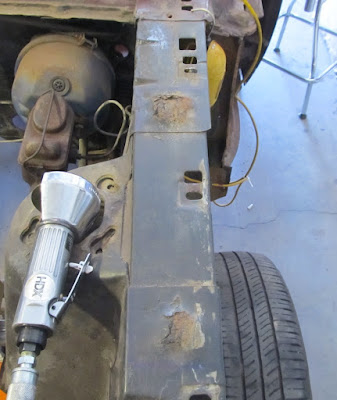
There are two apron overlaps on each side...and both need to be repaired. This all happens in the engine bay. Once the fenders are removed, you can see there are three pieces of sheet metal that make up each side of the engine bay - the front apron, the shock tower, and the rear apron. The shock tower is the middle piece. It's thick metal at 14 gauge. The aprons in front and behind are made of thinner 19 or 20 gauge metal.
Where the apron meets the shock tower, the metal is just overlapped and spot welded. The only thing that was used to protect against corrosion was hope and a short warranty period. The seams between the layers of metal are open on both top and bottom, so any moisture from the engine bay, or - more likely - the wheel well, will get in there and just rot the metal away.
Doing this repair, you get to learn how to drill spot welds, butt-weld different gauges of metal, and then use plug welds to join the two pieces together to simulate the spot welds from the factory. In fact, I'd recommend this as a good first welding project on a car to get a feel for how it's done - the metal is basically flat, and mostly unseen, so you can relax a little bit. Very early on, when I was figuring out what I was getting into, I read about this in detail on this blog by a hoopy frood named Alex, and it sort of gave me confidence that I could successfully do this, and other work, on this car. So I blame him.
I'm only showing one side since the other side is a mirror image. Plus, I'm about to discover I need new aprons, shock tower, and frame rail on that side anyway...

Here are the two rust nuggets in question. This is a shot looking at the top of the engine bay looking towards the back of the car.
I start with the rear apron overlap...

Rust, glorious rust! The junction of these two pieces is in trouble. The rust is clearly evident on top as well as from below, so we'll be cutting and replacing chunks of both the shock tower and the apron.

Strip the paint off the top to locate and then drill out the spot welds. I'm using the Communist Freight spot weld cutter. At $5 each, it's hard to beat. A single bit should get you through this entire post.
Factory weld/sealant manual says there should be 5 or 6, but here I found 8. Then I made a cut just aft of the shock tower metal and up along the inside edge so my patch piece can be mostly plain flat sheet metal.

I also cut out the rotten piece from the shock tower part of the junction. Use protection, kids - primer applied at the factory would have kept this from getting this bad. It's scary to think most overlapped/spot-welded joints on the car could look like this -- but remember, this particular junction sees extreme duty because it's exposed to water and dirt in the wheel well.

Bad metal gone - square up the edges and strip back the paint in prep for welding.

Patch piece of 14 ga. metal, clamped in and butted in tight. Thick metal like this is easier than the fender patch I just finished.

I did a series of tack welds and then filled in with bead welds in between.

Welds ground down flush and sanded for that lovely clean, new metal look.

Now the apron patch. Made of 20 gauge metal, with a bend on one end to match the existing outer flange and holds drilled for fake spot welds (plug welds). Weld-thru primer on the top of the shock tower and on bottom of the apron piece. The primer is scraped off (by me) at actual weld points. Cleaner welds are better welds. The primer is to protect the bare metal after the repair is complete.

Tack welds all around. At 20 gauge, more care must be taken. Ideally, this patch should be clamped flush with the piece underneath to you don't get blowouts while welding.

Mostly finished. The pinholes will need some clean up work later, but the metal is smooth and rust free. I'll use seam sealer underneath when the car gets primed so this won't happen again.
On to the front apron overlap....
Same story - both pieces are rotten. Cut out the rust, and replace with new, primed, rust-free metal.

Looks just like the first one - maybe not as bad?

Again - strip paint, locate and cut spot welds, and mark for cutting.

Another favorite tool when removing spot welds - the 5-in-1 painters tool. This and a mallet makes quick work of separating that last 10% of each spot weld the cutter misses.

Seriously - this is what is inside that junction.

Cleaned up to bare metal. You can see all the pitting and thinning of the metal on the shock tower. It has to go. You won't be able to weld to it very well, and there a rotted out hole in it.

Zing! Out goes the bad metal.

New patch going in.

Bead welded in place.

Welds dressed and metal all smoothed out. And more pinholes to deal with. I'm not gonna show that, but they need to be dealt with.

New apron patch, just like before. There are 4 or 5 plug welds going in here, but the clamps are in the way. Needs to be clamped up nice and tight - vertical gaps between these two pieces makes it more difficult to weld.

Isn't that nice?

Blamo! Rust nuggets are gone, Once it's all sanded and epoxy primed. it should look good as new. Remember, once the fenders are on, the only part of the top of the engine bay that is visible is the inner half - the outer half is under the fenders.
Comments
Post a Comment
Moderated and checked, albeit infrequently. Humans with real questions get answers, bots with spam get derezzed.