End of year review and current status
Merry Christmas! As 2015 closes out, I'm looking over all the progress so far, and I'm stuck by two things: I've gotten a lot of good work done, and I have so much more to do. I keep reminding myself this is a long term project ;)
Let's get the basics out of the way.
Yes, I'm still working on it.
No, it's not done yet.
No, it's not down on its own wheels yet.
I haven't posted much the past month as we're currently in the midst of a kitchen remodel that will likely drag until Spring, and this takes up some of my garage time on the weekends. Between this and the Christmas season, it's hard to get time to post much lately. And, if I'm perfectly honest, it's cold in the garage, and I'm basically a wuss when cold weather shows up. (Seriously, it's not even that cold - like 50 degrees.)
But, fear not, for I have time during the last week in December, so I'll get some posts together and published as January plows on. I have some cool stuff to show on the front frame repairs, which has lots of welding, cutting and general chaos.
Astute viewers will note that the blog isn't' really in 'real-time' yet - Posts are still catching up to the current State of the Project. But I'm getting close,which means I'll be posting events as they happen. As such, you might be surprised to learn what actually happened in 2015. Even more astute viewers (which I assume is anyone actually reading the text) will note that any posts previous to what's in here is the 2012-2014 story.
Let's review what got done this year, what we've learned, and what's coming up next.

I discovered how many layers of paint are on my car (2).

I finally realized that media blasting in my driveway is just not worth it.

I tackled my first exposed sheet metal patch on the drivers side fender. Not Terrible, but for 50+ hours, it better be Not Terrible.

Finally took on the notorious Fender Apron Overlapped patches.

Demonstrated once again that Rust Never Sleeps.

Enjoyed finally getting an item completely checked off the 'to-do' list.

I removed my first set of coil springs using the right tools and didn't almost die in the process.
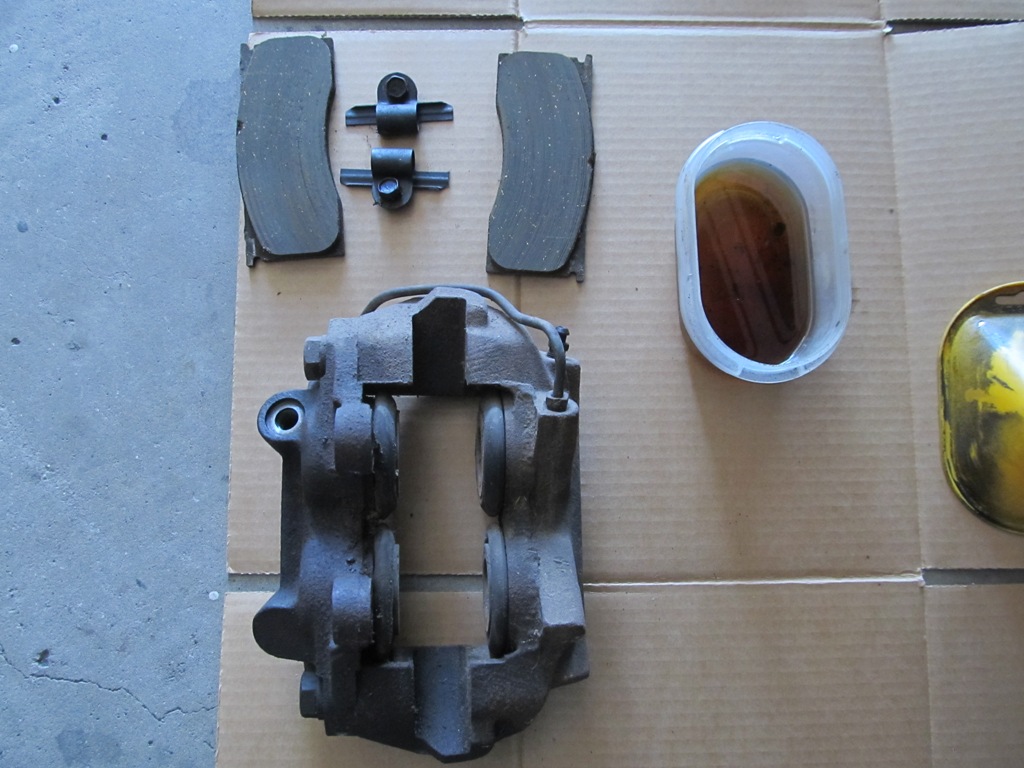
Removed the front brakes and learned that 4-piston calipers from 1967 are still pretty awesome pieces of hardware, and that 30 years between brake fluid flushes will give you something that looks and moves like maple syrup. Pro tip: Change your brake fluid at least once per decade. Maybe more.

We removed the front suspension (almost all original) and decided to keep as much as possible for the rebuild.

While removing the steering system, I figured out how much fun a pitman arm puller is for breaking those old joints. Turn, turn, turn, BANG! Don't worry, the hammer is for the mice in the garage, not the car.

Steering system out (less steering box). Finally decided to keep and refurbish the power steering setup and use the manual adapter.

I rediscovered the joys of taking things apart. The metal work is rewarding in a different way, but few things compare to a disassembly montage.

I learned that roll pins can be your Worst Nightmare if you don't locate and remove them properly. Look closely for the little jerk poking up in between the clamp ends. Still haven't resolved this yet.

The rest of the floor needs a good sanding and shot with a couple coats of epoxy primer. It looks OK from here, but actually the floor has more rust spots than a red-headed lifeguard has freckles.

I finally designed and built a frame jig for the Major Metal Work.

And got the car up on it for the actual Major Metal Work.
So that's where we got to on the blog this year. My plans for the next year, like most of us, are Grand in scale and cost. In particular, I'm hoping to get some major decisions worked out for the car:
- Brakes - I'm staying with the power-boosted 4-piston factory caliper set-up; for the calipers, I need to figure out if I'm rebuilding, outsourcing a rebuild, or just buying new parts.
- Steering - I've settled on the factory-like power steering setup but using a manual adapter - more effort but more road-feel and fewer (no) hydraulic issues.
- Suspension - the standard coil spring/strut rod setup will stay, with roller bearings where it makes sense and quality shocks. The stance will be level and the springs will be GT+ rates.
Once all of this is sorted and installed, I have a rusty quarter panel/wheel housing to deal with next. This part of the project promises to be one of the hardest. I have yet to decide on how to actually do the repair.
With any luck, once the metal work and paint stripping is done, we'll be ready to get the car out for bodywork and paint.
Thanks for following along. Here's some teaser shots of upcoming posts (use your inner movie-trailer voiceover for the full effect):

"In a world...where a Floor support is removed and replaced - while the floorpan is STILL INSTALLED..."

"Where an ordinary dude gets in way over his head..."

"Where metal yields to Massive Hydraulic Forces..."

I teach myself to do plug welds upside down.

And discover the secret method of removing a radiator support in 27 easy steps.

Keep the faith, friends. It can be done.
Comments
Post a Comment
Moderated and checked, albeit infrequently. Humans with real questions get answers, bots with spam get derezzed.