Floor Pan refurbishment - Why leave Good Enough alone?
Restoring an older car can be a slippery slope. What starts as a quick cleaning or part replacement can quickly turn into a much larger and more involved project. In Engineering, it's called "scope creep"; in restoration parlance, it's referred to as the "while-I'm-at-it" sickness. Whatever you call it, it'll eat more time and money and possibly open up more cans of worms than one may be comfortable with.
Now, that said, this isn't really a case of "while-I'm-at-it", but really just a long delayed chore that I'd put off because I thought it would suck, and it turned out to be worse than that. In fact, this is the most unpleasant task of the restoration so far.
The floors on old Mustangs are notorious for rusting out from cowl leaks under the dashboard, years of being driven on road salt, and old undercoatings that would trap moisture next to the metal. In my case, the floor had very little rot. In fact, I almost felt guilty showing it on the forums because so many folks have it much worse than I do. It's not so much that the floor isn't rotted out - it's more that it hasn't rotted out yet. Mine's not rusty, it's just really dirty. Shouldn't be too hard to clean the dirty off and make it nice, right?
I've already taken care of the backend of the floor pan and the interior side of the floor. All that's left now is the bottom of the cabin floor. It's about 40 square feet of metal that, if you're doing it right, never sees direct sunlight, and no one but tow truck drivers, mechanics, and car show attendees will ever see. So why bother messing with it at all, if 98% of the world will never know it's been done? Because when I see those pictures of perfectly restored floors out there in Interweb Land, it's makes me all weak in the knees. I want my hidden metal to look good too! Logic be gone, let's do some cleaning!
I'll cut to the chase - what my cleaning revealed was widespread minor surface rust. I needed to more than just clean this floor, I'd need to decide if I was going to either (1) remove the rust, and as a result, put a new, proper coating over it, or, (2) just leave it alone after the cleaning and let it ride.
Also, keep in mind that I'm going to do this trick while on my back and the car's on jackstands, giving me about 18 inches of working clearance from floor to car. No room for a rotisserie in my garage, so the old school methods will have to do...
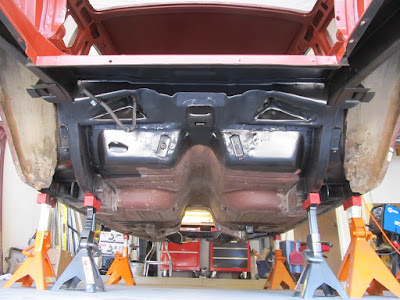
 Before the project started, this was the view under the car. I've said it before, this car was covered in oil-rich muck and a thick layer of dirt and grime all over from a leaking power steering system and a leaking rear main seal in the engine.


Tunnel view, looking forward to engine bay. Most of the dirt was able to be cleaned off with a 1:1 mix of warm water and simple green. Unfortunately, it has to be cleaned off while I'm on my back and have about 18 inches of room to work. But the cleaning reveals the factory primer. This car is a very late '67 model built in San Jose, CA. While the other plants in New Jersey or Michigan would use 'slop paint' to prime the bottom of the car, San Jose cars were very consistently covered in various shades of red-oxide. This is sort of a pink-salmon color.


While I've already shot the interior in red-oxide epoxy primer, the rear section was finished in black epoxy. I tried the red oxide under there first, and just didn't like it. My coating of choice is still the SPI epoxy primer (see link in 'resources' sidebar), but you'll notice the salmon-colored factory primer still on the floor pan doesn't really match the bright tone of the fresh red-oxide primer from SPI. So I want to use the black on the rest of the floor. I think...
Now, I struggled with this in my head quite a bit for weeks, maybe months. Was I making a mistake? I'm not doing a concours restoration, but - like they say - "it's only original once". By scraping and recoating over the factory primer, I'll lose that little bit of history on the car. You can still see all the drips and runs in the factory process. as well as the blackout paint on the edges of the floors.
In the end, I decided that it's my car, and my rules: I get to do what I want. And what I want is clean, smooth, new-looking metal, even if no one will ever look for it. I decided on a compromise - I'll record the neatly preserved features on the floor here for anyone who cares to look at, and then I'll slather new black epoxy primer all over the clean, rust free metal.
So, for the record:


I love it, and have no regrets about doing it. I know the rust is gone, and even though it's not factory-correct, I love the look of the black epoxy primer. Some folks will follow this step with an undercoating of some kind, but I'm not sure I want to do that just yet. If I do, it'll only be down the rocker panels where they're likely to get chewed up by road grit.
It took me over 50 hours of work to get this done, spread out over almost a year ('cause, like I said, this job just suuucks...)
So, lessons learned:
1. Remember whose car this is. If it's yours, and you're not doing the concours thing, you get to do what you want. You want to paint Shelby stripes on the floor? Go for it.
2. A rotisserie would make this job a lot easier, but it can be done without it. But next time, you better believe I'll buy/rent/steal one for this step.
3. This is an unpleasant process, but the end result it totally worth it. I would suggest just doing the whole thing in one long weekend instead of dragging it out for months like I did.
4. Seam sealer selection is hard. In the end, it comes down to how much you really want to spend on what is essentially glorified bathroom caulking. In my case, it was $20.
Now, that said, this isn't really a case of "while-I'm-at-it", but really just a long delayed chore that I'd put off because I thought it would suck, and it turned out to be worse than that. In fact, this is the most unpleasant task of the restoration so far.
The floors on old Mustangs are notorious for rusting out from cowl leaks under the dashboard, years of being driven on road salt, and old undercoatings that would trap moisture next to the metal. In my case, the floor had very little rot. In fact, I almost felt guilty showing it on the forums because so many folks have it much worse than I do. It's not so much that the floor isn't rotted out - it's more that it hasn't rotted out yet. Mine's not rusty, it's just really dirty. Shouldn't be too hard to clean the dirty off and make it nice, right?
I've already taken care of the backend of the floor pan and the interior side of the floor. All that's left now is the bottom of the cabin floor. It's about 40 square feet of metal that, if you're doing it right, never sees direct sunlight, and no one but tow truck drivers, mechanics, and car show attendees will ever see. So why bother messing with it at all, if 98% of the world will never know it's been done? Because when I see those pictures of perfectly restored floors out there in Interweb Land, it's makes me all weak in the knees. I want my hidden metal to look good too! Logic be gone, let's do some cleaning!
I'll cut to the chase - what my cleaning revealed was widespread minor surface rust. I needed to more than just clean this floor, I'd need to decide if I was going to either (1) remove the rust, and as a result, put a new, proper coating over it, or, (2) just leave it alone after the cleaning and let it ride.
Also, keep in mind that I'm going to do this trick while on my back and the car's on jackstands, giving me about 18 inches of working clearance from floor to car. No room for a rotisserie in my garage, so the old school methods will have to do...


Once the drivetrain was pulled out, it was easier to see just how messy this was. But, notice, no real rust to speak of! This is looking down the transmission tunnel from the firewall.

Here's the floor near the emergency brake connection point.

Another view of the emergency brake connection point.

Tunnel view, looking forward to engine bay. Most of the dirt was able to be cleaned off with a 1:1 mix of warm water and simple green. Unfortunately, it has to be cleaned off while I'm on my back and have about 18 inches of room to work. But the cleaning reveals the factory primer. This car is a very late '67 model built in San Jose, CA. While the other plants in New Jersey or Michigan would use 'slop paint' to prime the bottom of the car, San Jose cars were very consistently covered in various shades of red-oxide. This is sort of a pink-salmon color.

Finally, a clean floor! But look closely and you'll see the rust spots all over...

A closer shot shows the floor is covered in these rust spots, like freckles on a red-headed lifeguard. This is the real problem here. So, leave it alone, or fix it? Will it rust through if left alone? Would you want to wait and find out?

In several places the primer is just gone and has exposed bare metal...


And in some cases even more surface rust, here where the tires kick up road debris under the rocker panels. The factory blackout is also visible here.


While I've already shot the interior in red-oxide epoxy primer, the rear section was finished in black epoxy. I tried the red oxide under there first, and just didn't like it. My coating of choice is still the SPI epoxy primer (see link in 'resources' sidebar), but you'll notice the salmon-colored factory primer still on the floor pan doesn't really match the bright tone of the fresh red-oxide primer from SPI. So I want to use the black on the rest of the floor. I think...
Now, I struggled with this in my head quite a bit for weeks, maybe months. Was I making a mistake? I'm not doing a concours restoration, but - like they say - "it's only original once". By scraping and recoating over the factory primer, I'll lose that little bit of history on the car. You can still see all the drips and runs in the factory process. as well as the blackout paint on the edges of the floors.
In the end, I decided that it's my car, and my rules: I get to do what I want. And what I want is clean, smooth, new-looking metal, even if no one will ever look for it. I decided on a compromise - I'll record the neatly preserved features on the floor here for anyone who cares to look at, and then I'll slather new black epoxy primer all over the clean, rust free metal.
So, for the record:


Factory drips in the primer as it dried while moving down the assembly line.

Runs in the primer. This lets me forgive myself if I have any runs in my primer too, right?

Blackout trim at rocker over the floor primer, with a notch where tooling of some kind was in the way of the spray wand.


OK, so here's where we start stripping metal after cleaning...again, on my back, holding the angry grinder over my head and trying not to kick the jack stands out from under the car.


Masked and cleaned with Wax and Grease Remover..

First coat goes on nicely.

After the first coat of epoxy was on, I put seam sealer in all the right places (per the weld and sealant manual) and over some seams where I patched metal in the floor. Naturally, I forgot so take pics, but if you've ever caulked a shower, you have an idea of what this is like. Except you're on your back and the caulk has consistency of warm caramel.
The seam sealer is the NAPA in-house brand that can be used with a standard caulk gun, and is about $20/tube. If you want to move up to what the pro's use, those 2-part seam sealers are about $50/tube and you'll need a special gun for about $100 or more. I looked at this long and hard, and the consensus is this is the best 1-part sealer people are liking. Time will tell.
Apply the sealer about an hour after the first coat of primer, and let the sealer cure about an hour before shooting the second coat of primer.

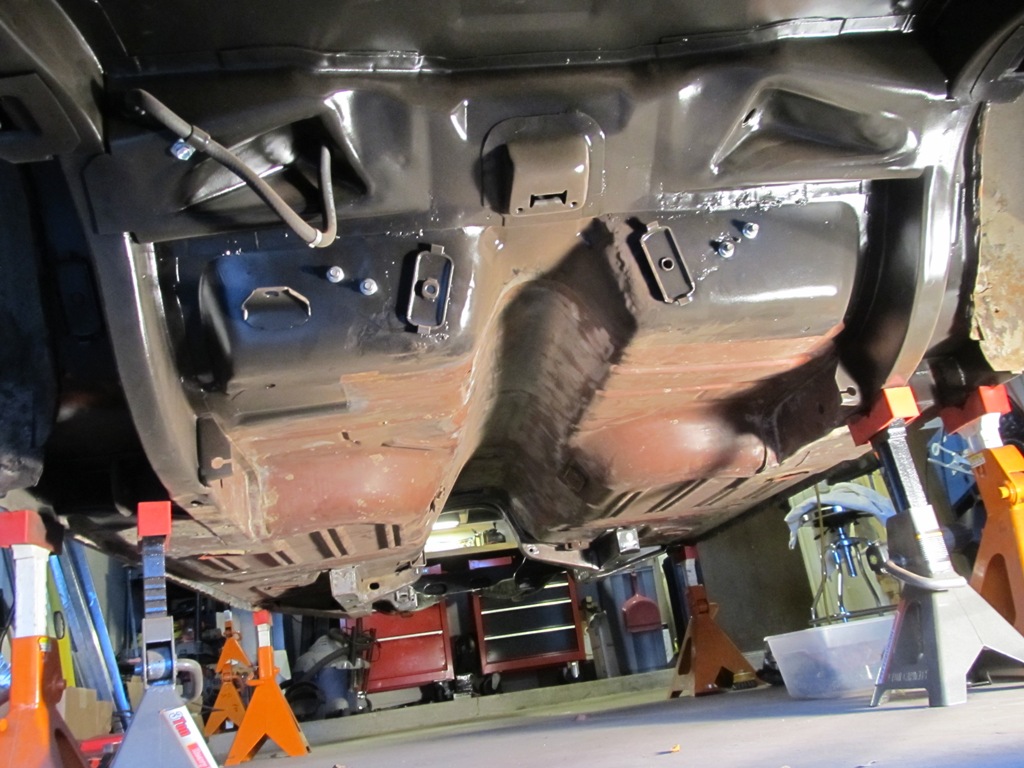
Second coat is on, an it's everything I wanted it to be.


I love it, and have no regrets about doing it. I know the rust is gone, and even though it's not factory-correct, I love the look of the black epoxy primer. Some folks will follow this step with an undercoating of some kind, but I'm not sure I want to do that just yet. If I do, it'll only be down the rocker panels where they're likely to get chewed up by road grit.
It took me over 50 hours of work to get this done, spread out over almost a year ('cause, like I said, this job just suuucks...)
So, lessons learned:
1. Remember whose car this is. If it's yours, and you're not doing the concours thing, you get to do what you want. You want to paint Shelby stripes on the floor? Go for it.
2. A rotisserie would make this job a lot easier, but it can be done without it. But next time, you better believe I'll buy/rent/steal one for this step.
3. This is an unpleasant process, but the end result it totally worth it. I would suggest just doing the whole thing in one long weekend instead of dragging it out for months like I did.
4. Seam sealer selection is hard. In the end, it comes down to how much you really want to spend on what is essentially glorified bathroom caulking. In my case, it was $20.
Comments
Phil
Post a Comment
Moderated and checked, albeit infrequently. Humans with real questions get answers, bots with spam get derezzed.