Steering system installation
With the suspension in place, now the steering system can go back in. (Relax, mom, given the inherently informal nature of a blog, it's really ok to end a sentence with a preposition!)
The steering setup will be "improved stock components", just like the suspension. We're rebuilding and restoring what we can, and buying some parts new. The biggest change is the move from the factory power steering to manual steering by using an adapter piece. More on that later.
This being my first experience with this sort of steering linkage design ("recirculating ball w/ drag link", instead of a more modern "rack-and-pinion"), I had to sort of figure out what I was looking at as it came apart.
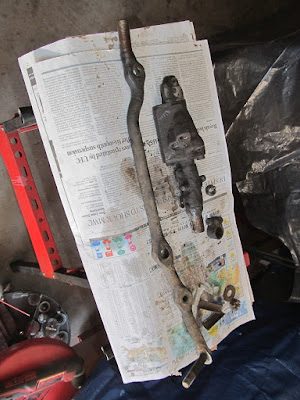
First up, the steering box . Here's how it came out of the car:


Since I've never actually driven the car, I have no idea if the box is working ok or not. So I decided to send the box off to Dan at Chockostang to get the box stripped down, rebuilt and cleaned up. Dan's the man, and turnaround time was less than a week. I asked him after the rebuild what kind of shape it was in beforehand. He said it was low on grease, well used but not too badly worn out. It's good as new now, and ready for install. Dan paints the box a light cast-iron, which goes well with the rest of the steering parts.


The steering setup will be "improved stock components", just like the suspension. We're rebuilding and restoring what we can, and buying some parts new. The biggest change is the move from the factory power steering to manual steering by using an adapter piece. More on that later.
This being my first experience with this sort of steering linkage design ("recirculating ball w/ drag link", instead of a more modern "rack-and-pinion"), I had to sort of figure out what I was looking at as it came apart.
First up, the steering box . Here's how it came out of the car:


The bottom of the box has all kinds of identifying markings on it (including the part number C6ZR-3550-A), but the one that really counts is the metal tag on the end of the box that details what sort of box it is.

SMB-E is the code on this box. which indicates it's a 16:1 ratio (the quick one) short-shaft box with a 1-inch pitman arm connection., using the decoder ring I found at Stanger's Site. (For 1967, there are no less than 6 different variations of steering system configurations. It takes a while to figure out what's going on here.)
The quick ratio of the box means better steering feel when driving (good!), at the expense of more required effort to move the wheels at slow speeds. (um...) Because I'm converting this setup to manual steering, it also means there won't be a power steering pump to rob horsepower from the motor (also good!)
The downside of this box means that I have to keep my drag link because that particular version isn't reproduced. That's fine, mine's in good shape. (Until I buggered it up, anyway...)

Shiny!

The rag joint connects the steering box to the steering shaft. The rubber's good, and the splines are still sharp, so it's a keeper.

Cleaned up and ready to go.
Onto the drag link (a.k.a. the 'center link'). Some funny things happened as I starting it stripping it down and getting it ready to restore. First off, the end of the link that's opposite the steering box (where the idler arm attaches) has some funky thing on it. I thought it should be a smooth bearing surface. Turns out (steering pun!) that the bushing from the old idler arm is stuck on there and has to be cut off. No problem, I can handle this...

The end of the drag link needs to be freed from that old bushing.

Dremel and a cutting wheel - no problems!

Except for the new groove I just cut into the bearing surface. Aaaaaah, crud. A new problem to fix.

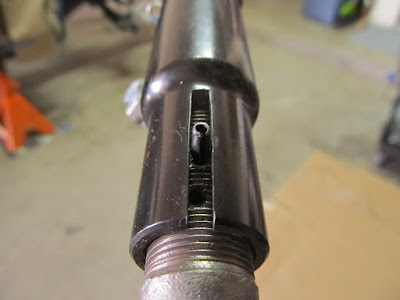
The other end of the drag link hosts the power steering control valve. Nasty thing - this is the source of most of the mess under the car I've had to clean and scrape off. The bolt facing down is what the pitman arm connects to. I'll be replacing this entire assembly with the manual steering adapter. Just have to get it off the the drag link. It should be easy. It just unscrews off the link once the clamp is loosened and the roll pin is removed. Easy, right?

Look closely - the clamp is centered right over a little roll pin that's driven into a hole in the drag link. The clamp holds the control valve in place. The roll pin is there as back-up to the clamp to keep the control valve from unwinding off the link and binding up the steering. That miserable little roll pin is made of hardened steel and is mounted in a blind hole, so you have to carefully pull it out of the hole in one piece.

Naturally, the roll pin broke off while being removed. (Please note the use of the passive voice here. It sounds better then the more correct active voice version "I broke the roll pin". Which, to be honest, is exactly what happened. Hint: pull, don't bend.)
It can't be drilled out (hardened steel), and it's in a blind hole, so I can't push it out from the other side. Sometimes I hate learning.

All taken apart, and now featuring two new problems to fix. Remember, this is not a reproduced part! I must fix this or start shopping for golf clubs!

Dirty drag link. I hate you.

Clean drag link. I hate you less, but you're useless to me until I get you fixed on both ends.

Here's the rare 1-inch sector pitman arm, covered in crud. Also not reproduced as far as I can tell.

Cleaning it off reveals the part number, C4ZA-3590-A; good news, it's supposed to be here.

To fix the groove that was cut that I cut into the surface of the drag link / idler arm interface, I decided to fill it with JB Weld and sand it to match the rounded contour of the shaft.

This worked out surprisingly well. The surface is very smooth now, ready for use, and shouldn't chew up the new idler arm that mounts to it.

The final solution for the broken roll pin? I took the link down to my favorite machine shop and had them drill a new hole in line with the old one. Here the manual steering adapter is in place. The roll pin simply has to be somewhere along that groove to work. I screwed the adapter on the end of the link (2 turns off the last thread per the instructions) and drove in the roll pin with a punch.
And only then did I realize I had forgotten to put the clamp on before all this, thus complicating my life again. >face-palm<

All the parts are fixed, painted, and ready to go. Note the Manual Steering adapter shown here on the drag link where the power steering control valve used to go.

New idler arm - this one is a version from Opentracker Racing Parts with roller bearings instead of the stock rubber bushings.

Steering box mounted, and pitman arm installed on the sector shaft on the bottom. For the record, the nut that secures the pitman arm to the steering box has the highest torque value of anything I've seen so far on the car: 150-225 ft. lbs.

Here's the manual steering adapter as installed. Apparently, the adapter was first used on early Corvette's as a way to to bypass the power steering for track days. Mustangs and Corvettes shared a similar power steering setup, so the adapter works here as well.

Tie rod ends connecting the drag link to the spindles.

The sleeves that connect the inner and outer tie rods together are one of the steering alignment adjustments. My old settings were based on bent parts and a bent frame rail, so I'm starting from scratch and putting them at a 'best guess' setting.

Here's the final setup. There are some grease fittings to fill and the wheels will still need to be aligned later, but for the most part, it's done.
Astute readers will note that without a steering column and wheel, it's not really done. I'd ask the astute readers to keep their collective criticisms to themselves. I'm working on it.
Astute readers will note that without a steering column and wheel, it's not really done. I'd ask the astute readers to keep their collective criticisms to themselves. I'm working on it.

Much improved over where we started!
Tips and tricks:
1. Respect the roll pin. It will ruin your day if you let it.
2. Don't apply all 150 foot-pounds of torque to the steering box internals. Use a block of wood to brace the spindle to the strut rod. This way, the wood takes the force, not the steering box.
Comments
Post a Comment
Moderated and checked, albeit infrequently. Humans with real questions get answers, bots with spam get derezzed.