Toeboard priming and interior seam sealing
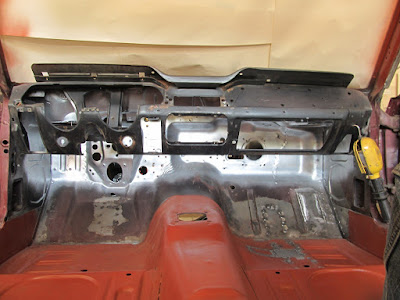
Now that the under-dash is done, I can finally finish the floor pan and toeboard priming. And once it's primed, I can seam seal it along with the rest of the interior.
Where we left off.
The toeboard gets a proper sanding, while the epoxy primer gets a good scuffing with red scotchbrite pads, followed by a good cleaning with W&G remover, and two coats of black epoxy. I'm not doing the whole floor, just the front foot wells and the sides of the rocker panels. This means I'll end up with a two-tone primer look, and hopefully I'll be able to just leave it like that and resist the urge to prime it all in black.
Cleaned and masked off.
Primer coat one is on.
I'm using a 3M single stage seam sealer I picked up at NAPA. They stopped carrying their in-house brand, so now you have to pay more for the 3M stuff. $20 per tube, so you need to be ready to use it when you cut the end. It gets tacky in less than 5 minutes.
I used the Weld & Sealant manual to figure out where all the seam sealer should go. The factory did seam sealer on bare metal and then primer and paint over that. Naturally this means you'll find rust under the factory seam sealer. So I'm doing seam sealer over primed metal.
Seam sealer at vertical junctions under the dash.
The rest of the interior needs seam sealing as well. As usual, I found a way to make this over complicated. I use chalk to mark the factory seams to be sealed. I'll scuff the primer, apply the sealer, and then put another primer coat over that.
Masked around the chalk lines so i only have to scuff the primer I'm going ot shoot with another coat of primer.
Cleaned with W&G remover, and then apply the sealer.
Mask the interior (why? there is no good reason to do this.) Shoot the primer.
All this is happening in the trunk as well.
Masking tape and paper is out, and here are properly sealed seams with a fresh coat of black epoxy. In hindsight I should have just scuffed and shot and let the overspray go where it wanted. Way less work that way and no one will ever see it.
Trunk seam sealer came out nicely as well.
The toeboard and the foot wells get their second coat of primer as well. I also hit the seam sealer under the dash with a topcoat of primer.
Done. This should be the last step for the interior as far as priming and sealing goes. The dash and the doors are all that's left. The floors are now ready for the next 50 years.


Comments
Post a Comment
Moderated and checked, albeit infrequently. Humans with real questions get answers, bots with spam get derezzed.